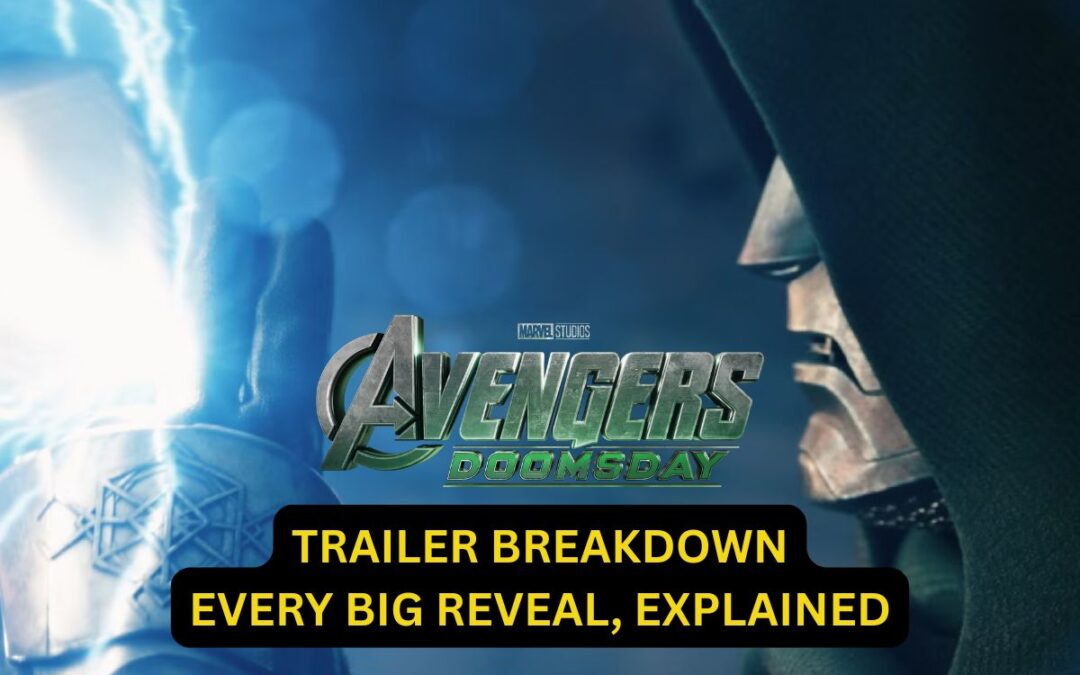
The first Avengers: Doomsday trailer just dropped, and honestly? It’s a lot.
Robert Downey Jr. is back — but not as Tony Stark. The Avengers are split into two teams. The X-Men showed up out of nowhere and they’re not exactly friendly.
Here’s the Avengers Doomsday trailer breakdown: this trailer packs in seven years of MCU set-up into two and a half minutes. If you blinked, you missed something.
Let’s break it down, piece by piece — no confusion, just the stuff that actually matters.
In This Post
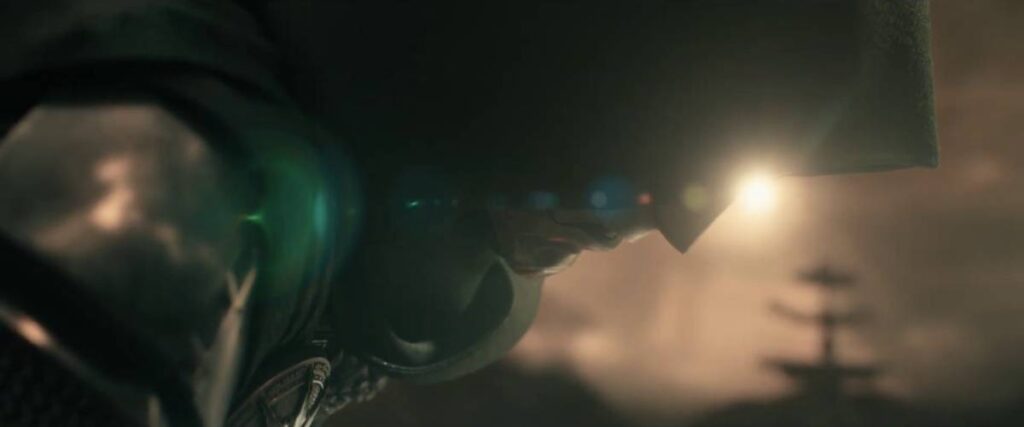
Doctor Doom’s Voice Is Finally Here — And It Changes Everything
Let’s start with the big one. We finally hear Robert Downey Jr. talk as Victor Von Doom, and he’s using a Latverian accent — the fictional Eastern European country Doom rules over in the comics.
Common mistake: assuming Doom is just “evil Tony Stark.” He’s not. This is a completely different character, and the accent is Marvel’s way of hammering that home from second one.
In his opening lines, Doom warns the heroes about something coming — something big enough to force an “unthinkable decision.” But later in the trailer, Thor is straight-up attacking him.
My recommendation: don’t read too much into the fight scene. In the comics, Doom’s playbook is always the same — team up first, betray later. He probably rallies the heroes against a bigger multiversal threat before making his own power play.
The Avengers Are Broken — And That’s the Whole Point
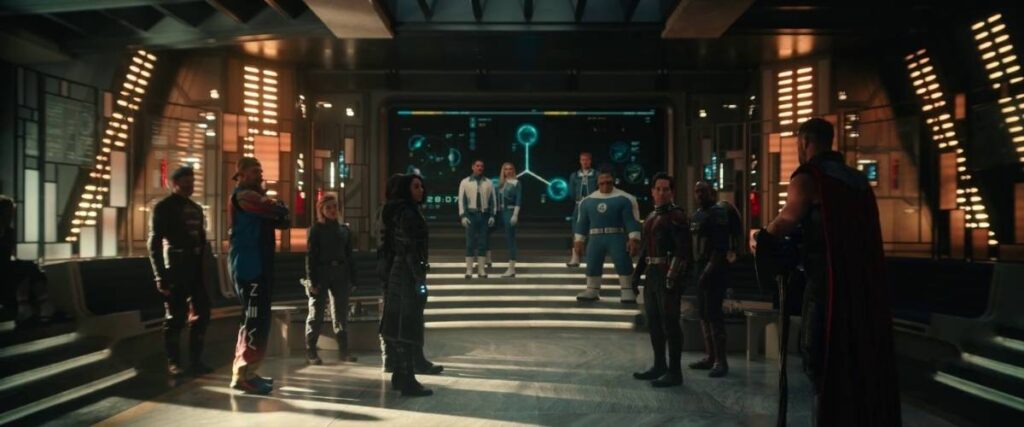
Here’s where casual fans might get lost. The Avengers aren’t one team right now.
Simple rule: remember these two groups going into the movie —
• New Avengers — led by Bucky, with Red Guardian and White Widow from the Thunderbolts crew
• Sam Wilson’s Captain America team — basically Sam and Ant-Man
Add in the fact that Iron Man, Cap, and Black Widow are all gone, and Thor and Hulk are the only real heavy hitters left standing. Ant-Man kicked Kang out of the MCU, sure, but that’s not enough firepower against Doom.
That’s exactly why Shuri’s Black Panther, Namor, and M’Baku show up in the trailer too — the mainline Avengers straight up need the backup.
If you don’t want to think too much: this movie isn’t “the Avengers vs. Doom.” It’s everyone the MCU has left vs. Doom.
Wait — Are the Avengers Fighting the X-Men Now?
This is the part that’ll make longtime Marvel fans sit up.
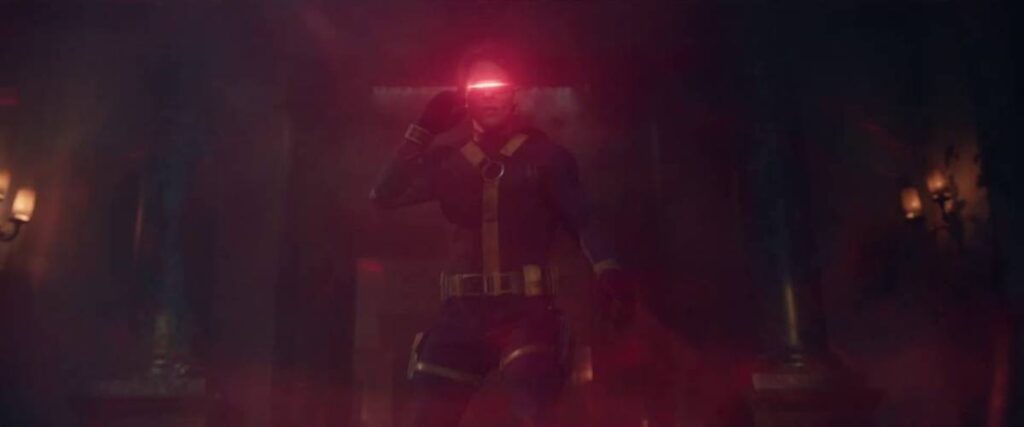
A big chunk of the trailer takes place inside Xavier’s School, with an aged Professor X and Magneto — played again by Patrick Stewart and Ian McKellen. James Marsden’s Cyclops, Rebecca Romijn’s Mystique, and Channing Tatum’s Gambit are all back too.
Here’s the truth: they’re not wearing the old black-leather movie suits anymore. They’re in the classic yellow-and-blue comic costumes — the same look from
• Gambit going head-to-head with Shang-Chi
• Mystique shapeshifting into White Widow to throw off the Avengers
So yes — for at least part of this movie, it looks like Avengers vs. X-Men. Whether that’s a real conflict or just the usual “heroes fight before they team up” trope, we’ll only know once the movie drops.
The Fantastic Four Are Here… But Barely Doing Anything
Marvel’s First Family made it to the main MCU timeline as promised, and the trailer confirms Ben Grimm (the Thing) has been hanging around with the Wakandans.
Common mistake: assuming this means the Fantastic Four are central to the story. Right now, they’re mostly just standing in the background — Johnny gets a hug with Sue and that’s about it.
That’s a little concerning, because in the comics, Doctor Doom’s entire motivation is his hatred for Reed Richards. If Reed’s just standing around while Doom fights Thor, the movie might be skipping the one relationship that actually explains why Doom does what he does.
Captain America Is Back — And Not the Way You Think
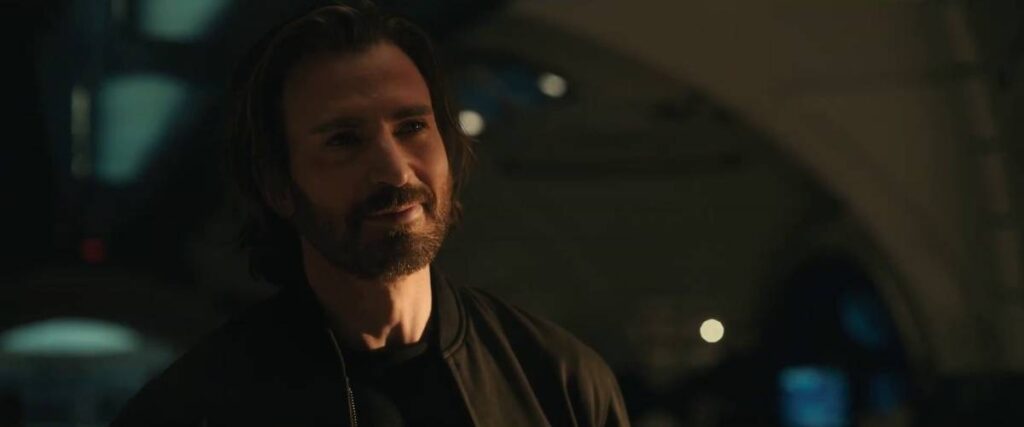
Steve Rogers returns in this trailer, bearded and all, and Thor hands him Mjolnir the second he shows up.
My recommendation: don’t overthink this one. Earlier teasers hinted “Steve Rogers” would return, not necessarily “Captain America” — which had some fans theorizing an evil version fighting alongside Doom. But Mjolnir only responds to the worthy, and Thor clearly trusts him. That theory’s basically dead now.
The Real Story Is Who’s Missing From the Trailer
This is the part most breakdowns skip, and it’s honestly the most interesting bit.
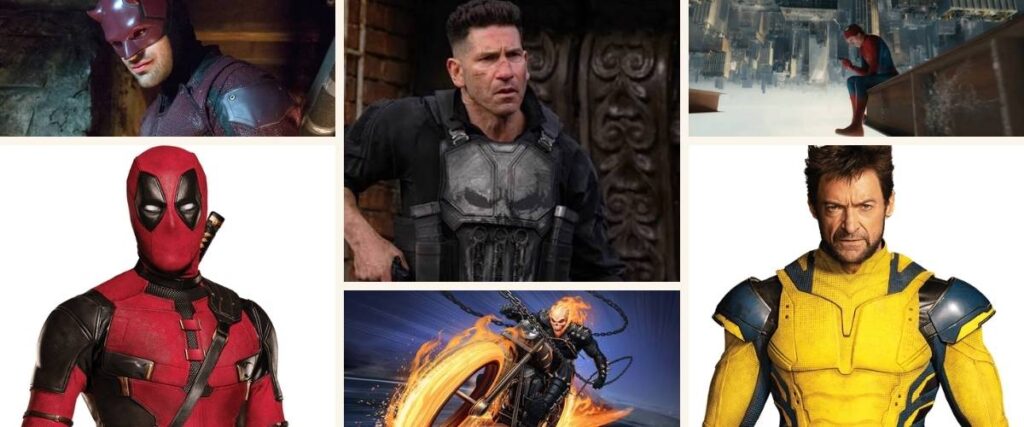
No Spider-Man — not Tom Holland, not Tobey Maguire, not Andrew Garfield. No Daredevil or the Netflix heroes. No Ghost Rider, no Punisher, and most notably — no Deadpool, no Wolverine.
Here’s where it gets interesting: we do see Loki holding his TVA card. Given how central the TVA was to pulling in outside universes during Deadpool & Wolverine, Loki might be the connective thread bringing in a few last-minute surprises — or he could just be busy being the God of Stories.
Simple rule: trailers rarely show every cameo on purpose. If a character isn’t confirmed dead or absent by name, assume Marvel is just saving the surprise for the actual movie.
So — Release Date, and Should You Be Hyped?
Avengers: Doomsday hits theaters on December 18, 2026.
If I had to recommend one thing — go in expecting chaos, not closure. This trailer is doing seven years of setup at once: broken Avengers, warring X-Men, an underused Fantastic Four, and a villain whose whole comic-book identity hasn’t even been touched yet.
That’s a lot to land in one movie. But if Marvel pulls it off, this could be the biggest crossover event since Endgame.
FAQs — Avengers Doomsday trailer breakdown
Is Robert Downey Jr. playing Doctor Doom instead of Iron Man?
Yes. Downey returns to the MCU as Victor Von Doom, a completely separate character from Tony Stark, complete with a new accent and backstory.
Are the X-Men part of the main MCU now?
It looks that way. The trailer shows the classic Fox-era X-Men actors — Patrick Stewart, Ian McKellen, James Marsden, Rebecca Romijn, and Channing Tatum — inside Xavier’s School, now in comic-accurate costumes.
Does Spider-Man appear in the Avengers: Doomsday trailer?
No version of Spider-Man appears in this first trailer, despite heavy speculation.
GTA Online hasn’t had a proper, marketed heist in years.
Sure, there’s been Dr. Dre. Clucking Bell. Oscar Guzman. All technically heists. But Rockstar hasn’t titled an update around one since the Cayo Perico Heist back in December 2020.
That changes this July.
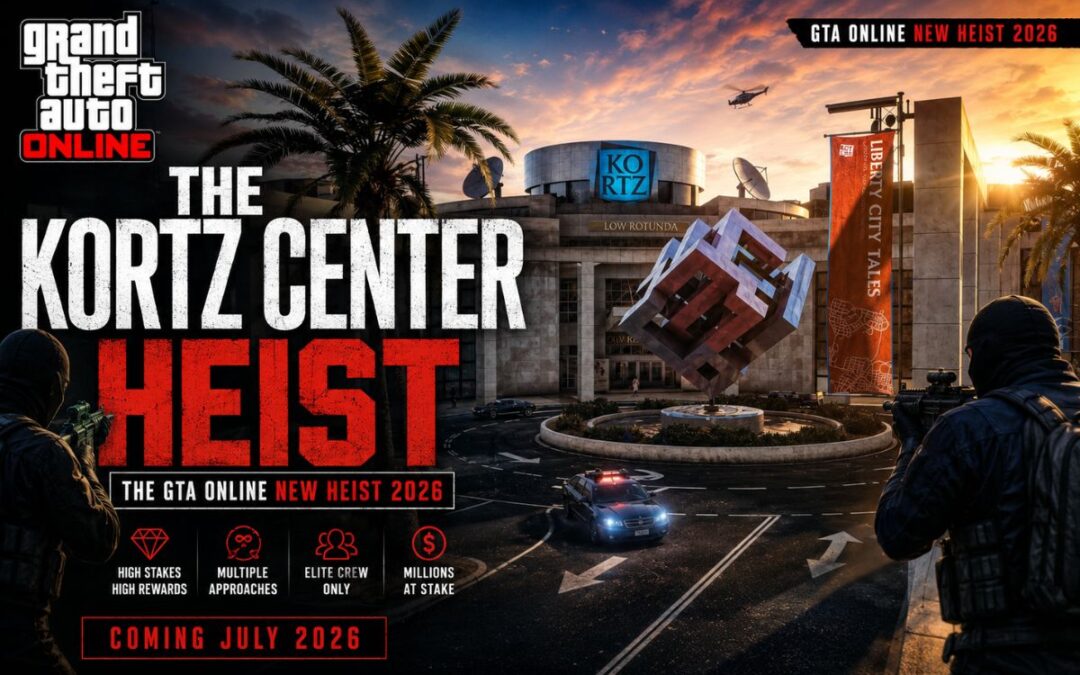
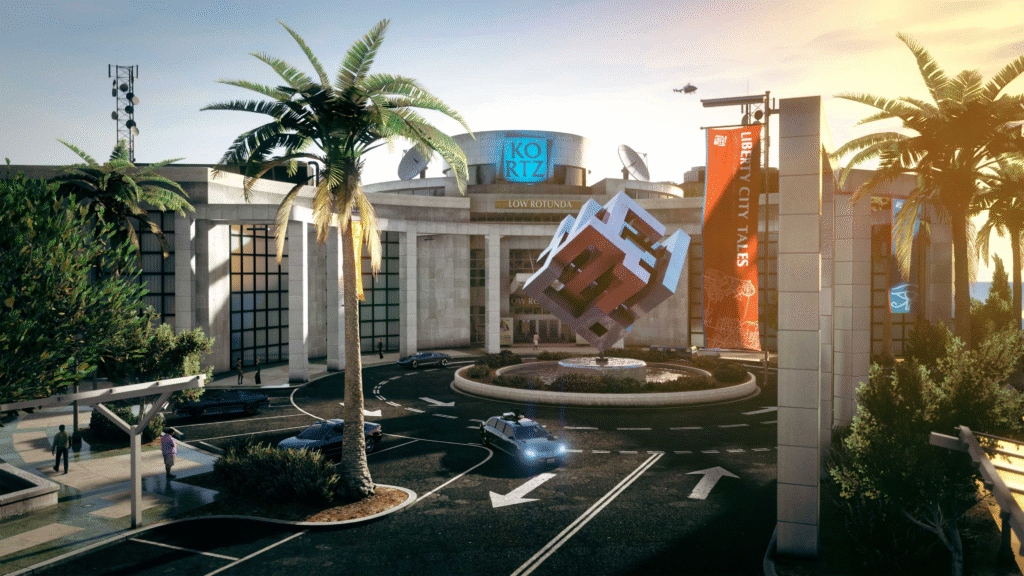
The Kortz Center Heist is the GTA Online new heist 2026 — and it already looks like one of the biggest updates the game has seen in a long time. Multiple approaches. A mansion requirement. Bonus money weeks incoming. And a fine art collector program that nobody fully understands yet.
Let’s break down everything Rockstar has teased — and more importantly, what you need to do right now to be ready.
Most people see ‘heist’ and assume it’s just another mission chain.
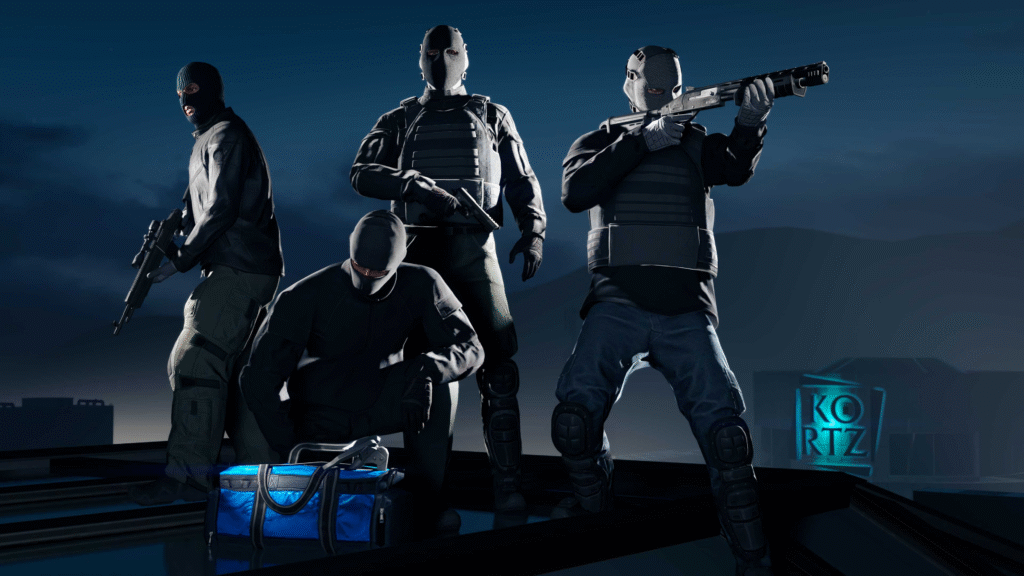
Here’s the truth: This is a full DLC update themed around a multi-stage heist. Not just one mission. You scope the location first, pick your approach, then infiltrate and escape the Kortz Center — a real in-game landmark sitting northwest of Los Santos on the Pacific Bluffs side.
Rockstar officially describes it as raiding the Kortz Center’s ‘prestigious galleries’ and ‘esteemed collection’ for personal gain. Multiple ways to do it. Multiple things to steal.
Here’s the truth: The last GTA Online update literally titled a ‘heist’ was Cayo Perico in December 2020. That’s almost 5 years ago. This is a big deal.
The Mansion Requirement — What You Need Before You Can Even Start
Common mistake: jumping into the update day one without the right property.
Rockstar has officially confirmed you need to own one of the new luxury mansions to access this heist. And that’s not the only cost — you’ll also need to install the Art Studio extension inside the mansion before you can begin setting anything up.
Based on the newswire language, the Art Studio isn’t optional. It’s a mandatory upgrade — similar to how previous businesses required equipment purchases before unlocking full features.
Fun detail: The Art Studio door has been sitting inside the mansion property the entire time — blocked by a wall and a bench. Literally no one noticed until data miners dug it up after the newswire dropped.
My recommendation: If you don’t own a mansion yet — start grinding now. You have about a month. Rockstar has also confirmed upcoming bonus money weeks specifically to help players prepare. More on that below.
Also worth noting: GTA Plus members are getting a $2 million discount on mansion properties. If you’re already subscribed, that’s a significant saving.
Multiple Approaches — How Replayable Is This?
Here’s where it gets interesting —
Rockstar specifically mentions ‘choosing an approach’ for the heist. That wording isn’t accidental. Multiple approaches means different entry methods, different setups, and potentially different targets — which is exactly how the Diamond Casino Heist worked.
We don’t have full details yet on how many approaches there are. But the language strongly suggests replayability is baked into this update from day one.
There’s also a ‘Fine Art Collector Program’ teased in the newswire. Nobody knows exactly what this is yet, but it sounds like a new progression layer tied to running the heist multiple times.
Simple rule: If this plays anything like the Diamond Casino Heist, you’ll want to run it multiple times with different approaches to maximize earnings. Don’t just one-and-done it.
The Preparation Weeks — How to Get Ready Before July
This is the section most people are going to skip. Don’t.
Rockstar’s newswire explicitly mentions ‘bonus money rewards,’ ‘record-breaking discounts,’ and ‘special events’ in the weeks leading up to launch. They know millions of players need to buy mansions and stack cash before July, so they’re structuring weekly updates around preparation.
Translation: the next few Thursdays should feature some of the best bonuses we’ve seen all year. Business bonuses, cash events, maybe even CEO Cargo weeks. If you’ve been waiting for a good time to grind — this is it.
If you don’t want to think too much: Log in every Thursday, check the weekly update, and play whatever is double or triple money that week. Do this for 3-4 weeks and you’ll be comfortable by launch day.
There’s also a 40% bonus on all GTA Shark Cards for a limited time. If you’re planning to spend real money, now is the window.
Need a guide on the best ways to make money in GTA Online right now? Check out our GTA Online Money Methods 2026 guide — updated for the current meta.
Free Console Upgrades — If You’re Still on Old Gen
Quick note for PS4 and Xbox One digital players.
Rockstar has confirmed that starting now, you can upgrade to PS5 or Xbox Series X versions of GTA V at no extra cost. Enhanced is objectively a better-looking, better-performing version of the game — faster load times, better draw distance, improved frame rate.
Simple rule: PS4 and Xbox One players — upgrade now. It’s free. Do it before the heist drops.
Solo or Crew? How to Approach the Kortz Center Heist
Rockstar mentions both solo and crew options in the newswire.
Solo players need the full mansion + Art Studio setup to run it independently. Crew play seems to be the alternative path — probably requiring less upfront investment but splitting the payout.
Common mistake: assuming solo is always better just because you keep the full cut. Depends entirely on how payouts scale and how the heist is balanced around player count.
Requirement: Mansion property + Art Studio extension (mandatory)
Approaches: Multiple (exact number TBA)
New feature: Fine Art Collector Program (details TBA)
GTA Plus bonus: $2M off mansion, 40% bonus on Shark Cards
Prep weeks: Bonus money events and record-breaking discounts on Thursdays
Play style: Solo or crew
Final Take
GTA Online is finally doing a real heist again.
Not a mission chain. Not a contract. A full multi-stage heist with scope, multiple approaches, and a dedicated DLC update.
If I had to say one thing — don’t wait. Get the mansion, stack the cash during the bonus weeks, and be ready day one. This is the kind of update worth showing up prepared for.
We’ll keep updating this post as Rockstar drops more details. Bookmark it.
Want to be fully ready before the Kortz Center Heist drops? Check out our GTA Online Beginner to Pro Guide — everything you need to walk in prepared.
FAQs — GTA Online New Heist 2026
When is the Kortz Center Heist coming out?
July 2026. Rockstar hasn’t confirmed the exact date, but the official newswire says ‘this summer’s exciting new update coming to GTA Online in July.’
Do I need a mansion for the Kortz Center Heist?
Yes. You must own one of the new luxury mansion properties and install the Art Studio extension before you can start.
Can you do the Kortz Center Heist solo?
Yes. Solo play is explicitly mentioned in the newswire. You’ll need the full mansion setup, but it’s doable without a crew.
What is the Fine Art Collector Program?
Not fully detailed yet. Rockstar teased it in the newswire but hasn’t given specifics. This post will be updated as more info drops.
Is this the biggest heist in GTA Online?
It’s the biggest heist-focused update since Cayo Perico in December 2020. Whether the payout tops Cayo remains to be seen — but the multiple-approach structure is a genuinely exciting return to form.
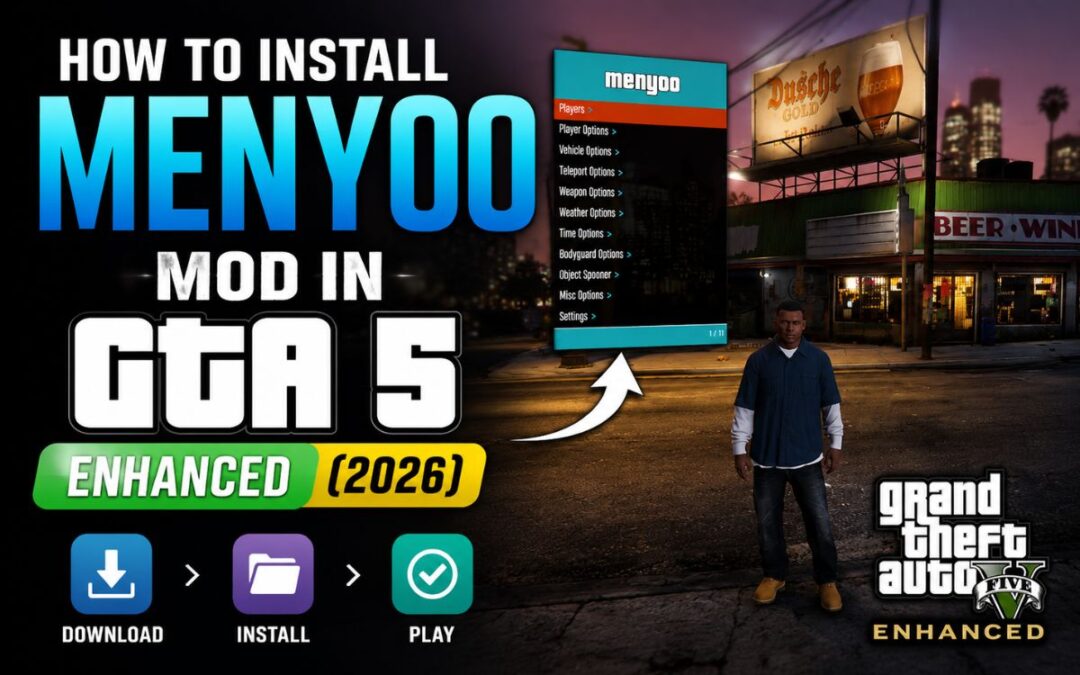
You want to know How to Install Menyoo Mod in GTA 5 Enhanced.
But the moment you search how to do it — suddenly there’s ScriptHookV, ScriptHookVDotNet, OpenRPF, ASI files… and it all feels way more complicated than it should be.
Don’t worry. I’ll make this simple.
This guide covers everything — which files to download, where to put them, and how to get Menyoo running in GTA 5 Enhanced step by step. No fluff, no confusion.
In This Post
What You Need Before Starting
Here’s the truth: Menyoo doesn’t work alone. It needs a few helper files to run. Most people mess up because they skip one of these.
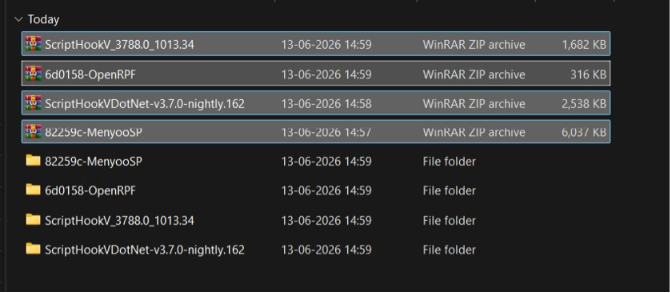
You need to download 4 things total:
Menyoo Mod (the actual mod menu)
ScriptHookV (lets the game run ASI mods)
ScriptHookV .NET / Community Script Hook (lets .NET scripts work)
OpenRPF (a tool Menyoo needs to load properly)
My recommendation: Download all 4 before you start installing anything. Don’t do it one by one — you’ll lose track.
Step 1 — Download All 4 Files
Head to your browser and go to gta5-mods.com. This is the only site you need — don’t download mods from random sites.
Search for “Menyoo” on gta5-mods.com. Download the latest version (at the time of writing, it’s v2.3.0). Save it in a folder you’ll remember — something like GTA5 Enhanced Mods works.
Search for “Script Hook V” on gta5-mods.com. Download the version that matches your current game version. You’ll see the version number listed — just grab the latest one.
Simple rule: If the site shows a blue Download button — click that. Skip any “insecure download” warnings from your browser — these files are safe.
Search for “OpenRPF” on gta5-mods.com and download it. All 4 download links will also be in the video description if you’re watching alongside.
Step 2 — Extract All Files
Once all 4 files are downloaded, select all of them and right-click. Use WinRAR or 7-Zip and choose Extract Each Archive to Separate Folder.
This gives each mod its own clean folder — which makes the next step way easier.
Common mistake: Extracting everything into one folder and then losing track of which file belongs to which mod. Separate folders = no confusion.
Step 3 — Install Everything Into GTA 5 Enhanced
Now open your GTA 5 Enhanced installation folder. If you’re not sure where it is — right-click the game in Rockstar Launcher and go to Properties or Open File Location.
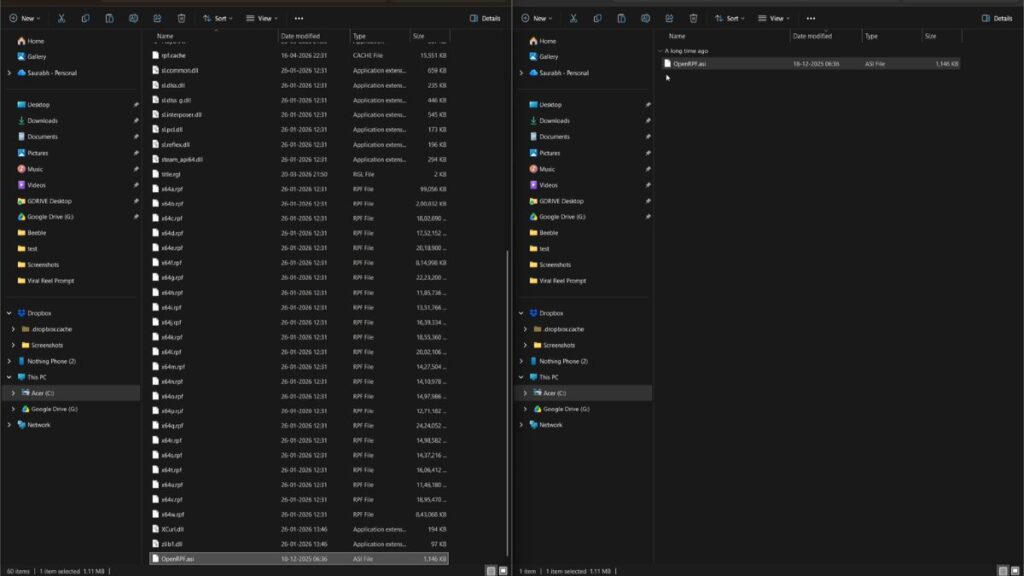
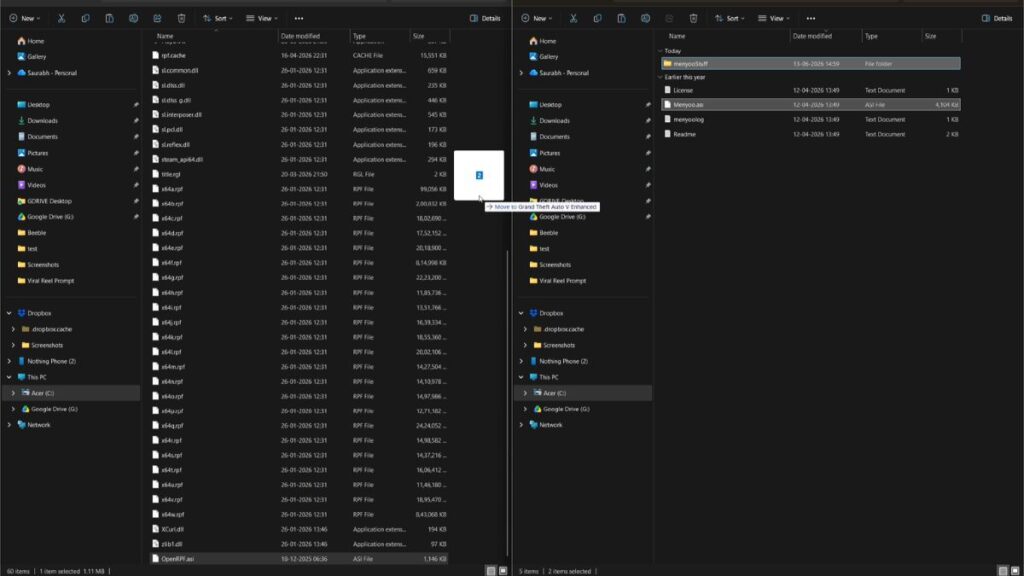
Here’s exactly what goes where: C:\Program Files (x86)\Steam\steamapps\common\Grand Theft Auto V Enhanced
OpenRPF
Copy the OpenRPF.exe or .asi file and paste it directly into your GTA 5 Enhanced root folder.
Default location: C:\Program Files (x86)\Steam\steamapps\common\Grand Theft Auto V Enhanced
Default location: C:\Program Files (x86)\Steam\steamapps\common\Grand Theft Auto V Enhanced
ScriptHookV
Open the ScriptHookV folder, then go into the bin folder. From there, select these 3 files:
dinput8.dll
ScriptHookV.dll
NativeTrainer.asi (optional but recommended)
Paste all 3 into your GTA 5 Enhanced root folder.
Default location: C:\Program Files (x86)\Steam\steamapps\common\Grand Theft Auto V Enhanced
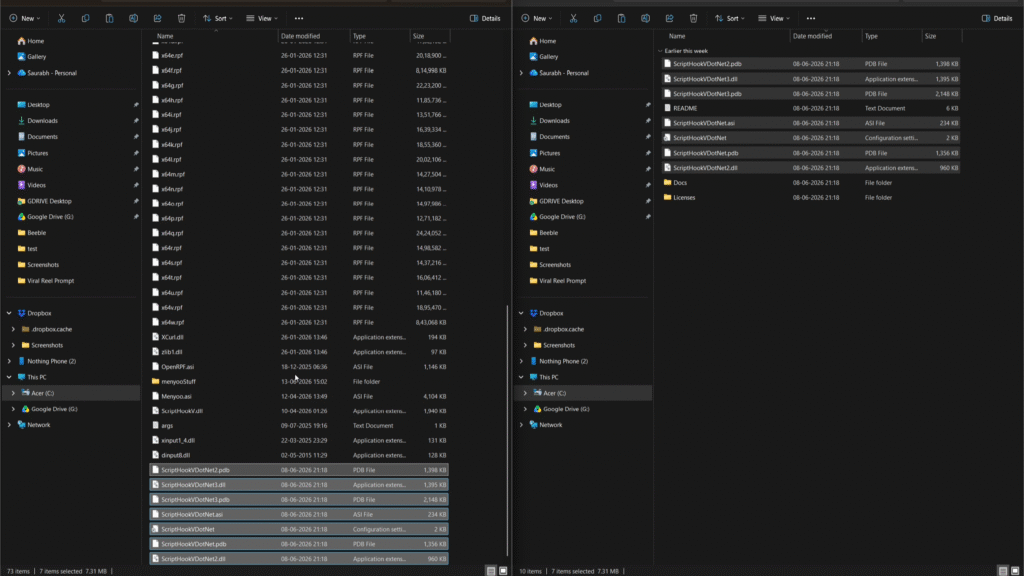
ScriptHookV .NET
Open the ScriptHookV.NET folder and copy everything inside — all files. Paste them into your GTA 5 Enhanced root folder.
My recommendation: After pasting everything, double check your GTA 5 Enhanced folder. You should see Menyoo.asi, ScriptHookV.dll, dinput8.dll, OpenRPF, and the Menyoo Stuff folder all sitting there.
Step 4 — One Important Setting in Rockstar Launcher
This is the step most people forget — and then wonder why mods aren’t working.
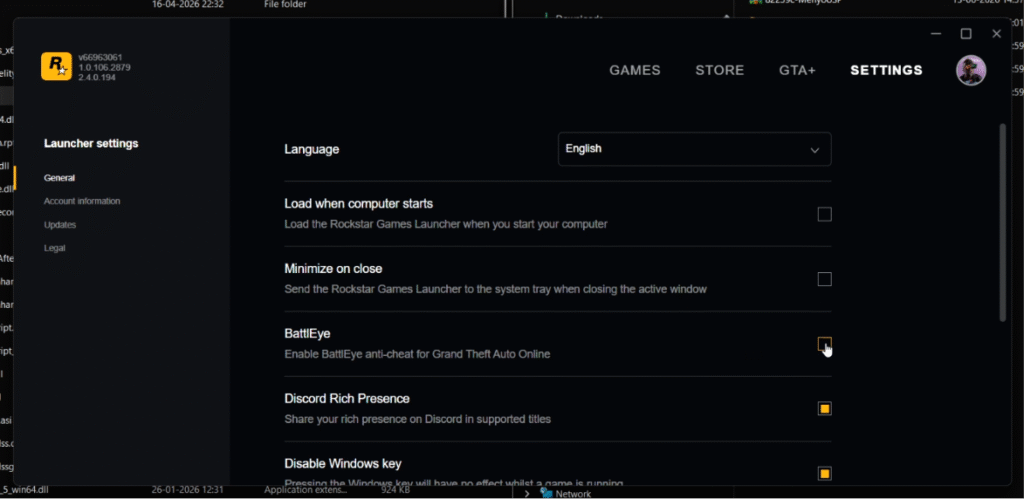
Open Rockstar Games Launcher and log in if needed. Then go to GTA 5 Enhanced settings and find the BattlEye option. Turn it OFF.
BattlEye is an anti-cheat system. It will block your mods from loading if it’s on. Simple as that.
Here’s the truth: You don’t need to turn off Discord overlay or anything else — just BattlEye. That’s the only one that matters for Menyoo to work.
Step 5 — Launch the Game and Test
Now just launch GTA 5 Enhanced normally through Rockstar Launcher.
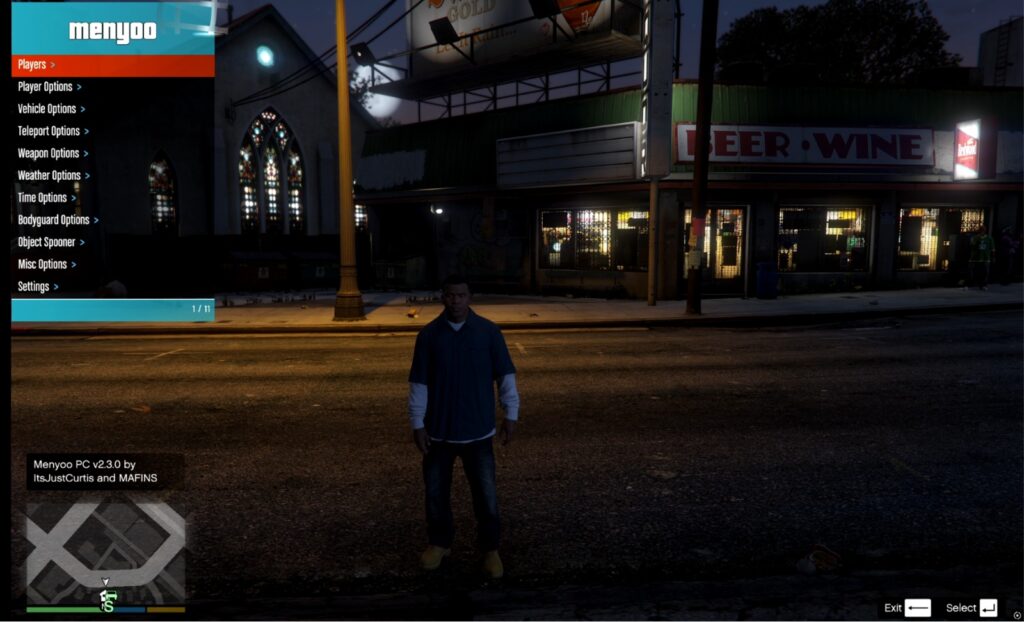
Once you’re in the game — press F8.
That’s it. Menyoo should open up right there on your screen. If you see the menu — congrats, you did everything right.
If you don’t want to think too much: Just press F8 as soon as you load into story mode. If the menu appears, you’re good. If nothing happens, jump to the troubleshooting section below.
Menyoo Not Working? Try This
Still confused? Here are the most common reasons Menyoo doesn’t open:
BattlEye is still ON — go back to Rockstar Launcher and turn it off.
You missed a file — check that Menyoo.asi, ScriptHookV.dll, and dinput8.dll are all in the root GTA folder.
Wrong ScriptHookV version — make sure your ScriptHookV version matches your game version. If you updated GTA recently, you may need to re-download ScriptHookV.
You’re in Online mode — Menyoo only works in Story Mode. Never use mods in GTA Online.
Common mistake: Trying to use mods in GTA Online. Don’t. You will get banned. Story Mode only.
Final Thoughts
Installing Menyoo in GTA 5 Enhanced sounds complicated — but once you do it once, it takes less than 5 minutes next time.
If I had to tell you one thing: get all 4 files first, turn off BattlEye, and paste everything in the right folder. That’s literally the whole thing.
The Bodyguard feature is a solid addition — feels polished, works reliably, and genuinely changes how you play story mode.
Good luck — and don’t shoot Doggo.
GTA 6 Update: Trailer 3 Timeline and Release Date Confirmed : Read More
Frequently Asked Questions
1. How do I open Menyoo in GTA 5 Enhanced?
Press F8 once you’re in Story Mode. That’s the default key. If nothing happens, double-check that BattlEye is turned off in Rockstar Launcher and that all 4 files are installed correctly in your GTA 5 Enhanced root folder.
2. Does Menyoo work in GTA Online?
No — and don’t try it. Menyoo is a single-player mod only. Using any mod in GTA Online will get your account banned. Story Mode is the only safe place to run it.
3. Which files do I need to install Menyoo in GTA 5 Enhanced?
You need exactly 4 things: Menyoo itself, ScriptHookV, ScriptHookV .NET (Community Script Hook), and OpenRPF. Skip any one of these and Menyoo won’t load. All download links are available on gta5-mods.com.
4. Why is Menyoo not opening even after installation?
Most common reasons: BattlEye is still ON, your ScriptHookV version doesn’t match your current game version, or you placed files in the wrong folder. Check that Menyoo.asi, ScriptHookV.dll, and dinput8.dll are all sitting in the GTA 5 Enhanced root folder — same place as GTA5.exe.
5. Is Menyoo safe to download?
Yes — as long as you download from gta5-mods.com. That’s the only source you should trust. Don’t download from random sites or YouTube comment links. The mod is community-maintained, open-source, and widely used.
6. How to install Menyoo mod in GTA 5 Enhanced?
To install Menyoo Mod in GTA 5 Enhanced, first download the latest version of Menyoo and ensure that Script Hook V is already installed. Extract the Menyoo files into your GTA 5 Enhanced main game directory, then launch the game. Once in-game, press F8 (default key) to open the Menyoo trainer menu and verify that the mod has been installed successfully.
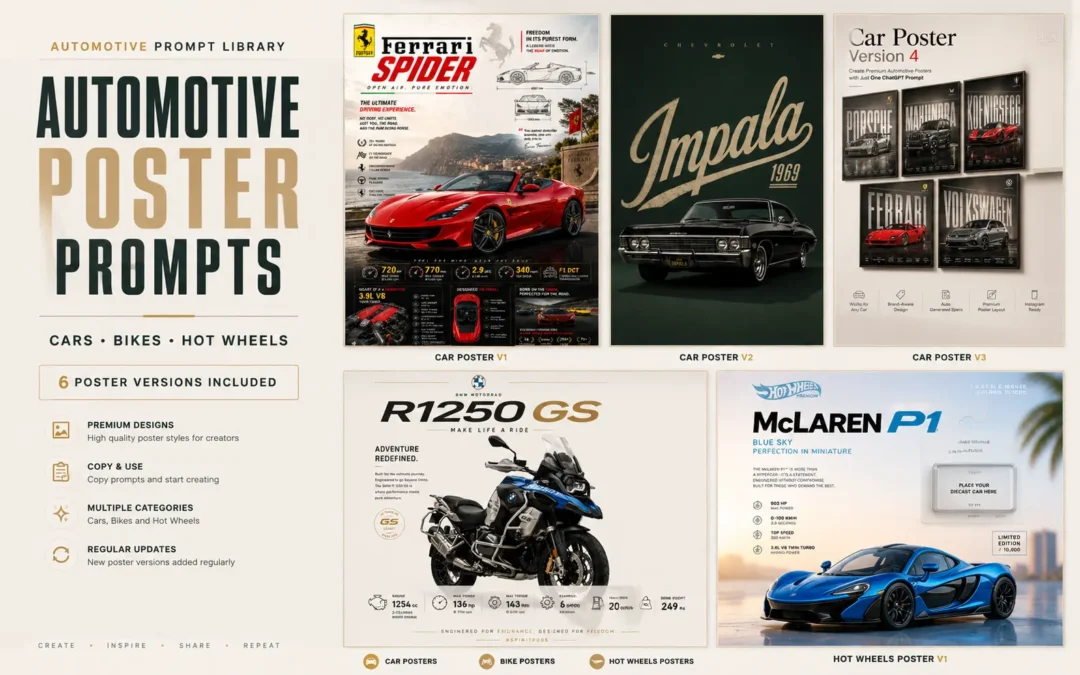
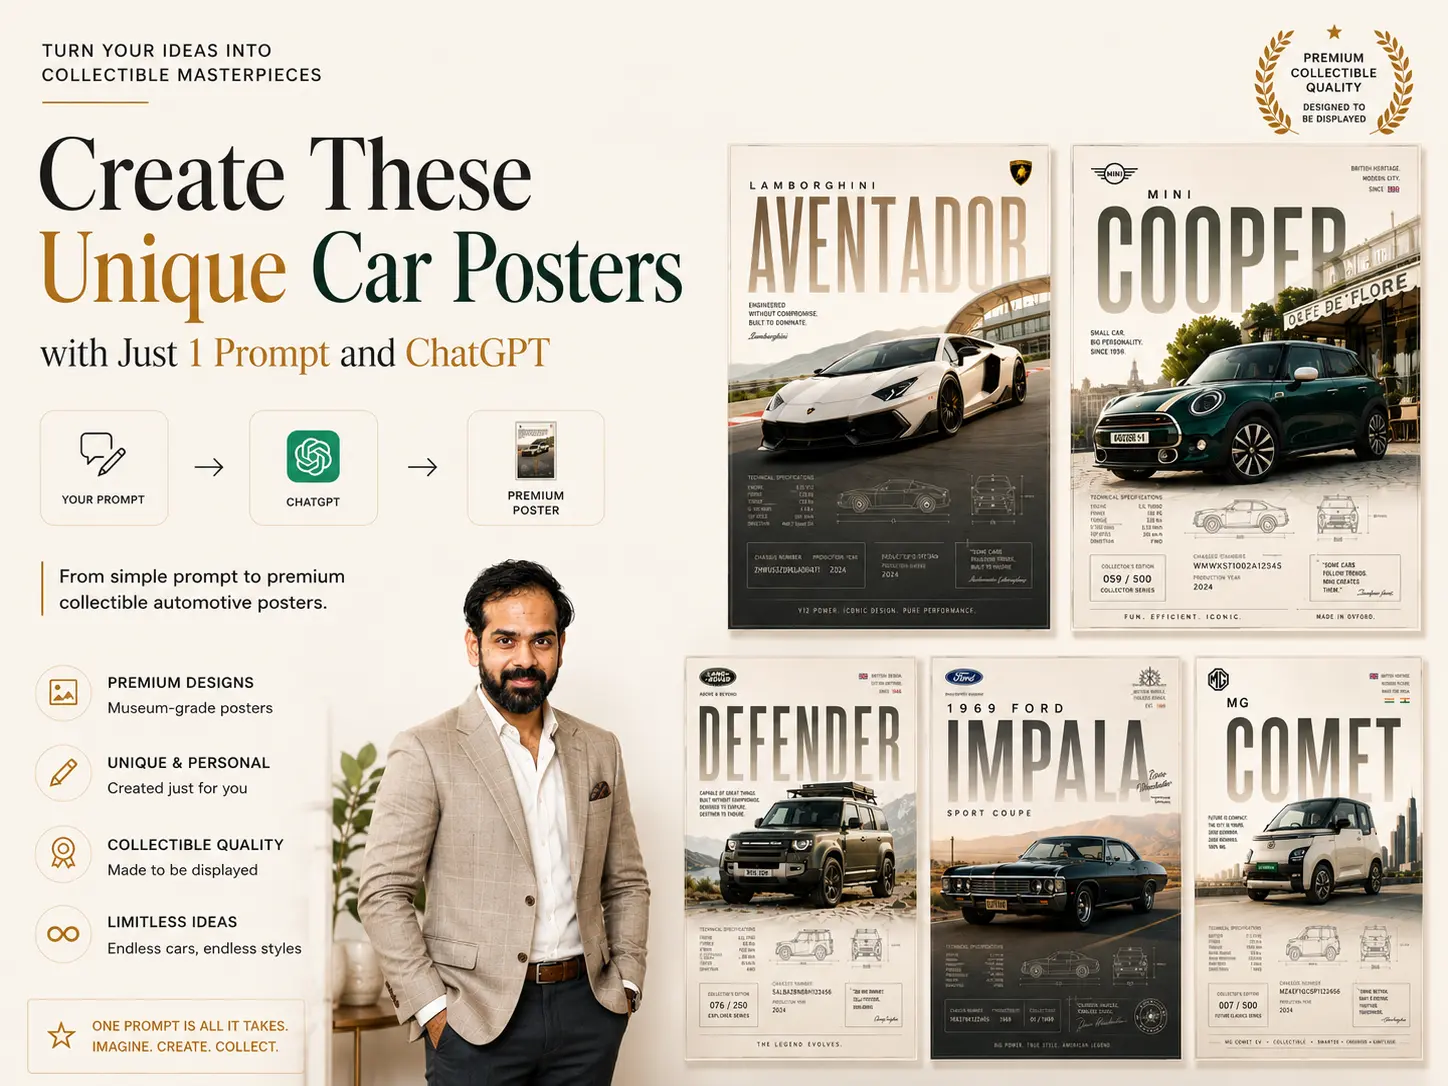
If you’ve ever wanted to create those insanely good-looking automotive posters you see on Instagram, you’re in the right place.
This page is where I keep all my automotive poster prompt versions in one place.
Right now you’ll find car posters, bike posters, and Hot Wheels poster prompts, and I’ll keep adding new versions whenever I create something worth sharing.
Just pick a poster style, copy the prompt, and start creating.
These are the poster versions available right now.
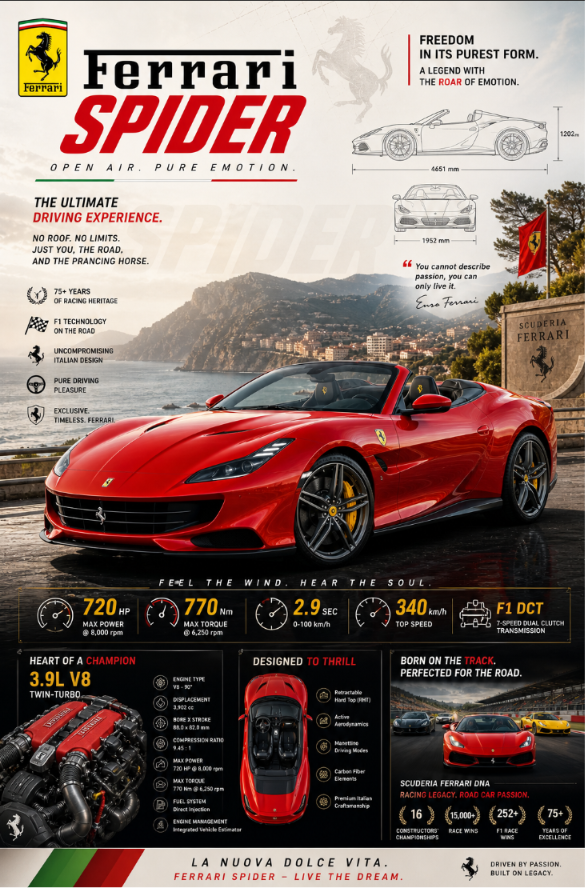
Automotive Poster Ver-1.0
Create an epic premium automotive poster of super[CAR NAME]. Place the car as the heroic central subject in a dynamic three-quarter side profile, visually dominant and impossible to ignore. Show the full beauty of the vehicle with aggressive stance, perfect proportions, premium wheels, signature headlights, aerodynamic lines, spoilers, performance details, and luxury design language. ar 9:16

Add bold premium typography with the brand name, model name, performance stats, horsepower, acceleration, top speed, engine specs, and iconic achievements beautifully integrated into the composition. Include subtle background elements inspired by the car’s heritage: faded blueprint lines, racing legacy, silhouette overlays, iconic tracks, engineering details, speed graphics, and collector-poster aesthetics.

Use strong visual contrast, bright premium colors (avoid dark black-heavy backgrounds), cinematic lighting, ultra-detailed reflections, glossy paint finish, luxury magazine quality, modern graphic design, and scroll-stopping masterpiece energy. Clean composition, high-end automotive advertisement style, collector poster aesthetic, highly detailed, visually powerful, premium masterpiece.
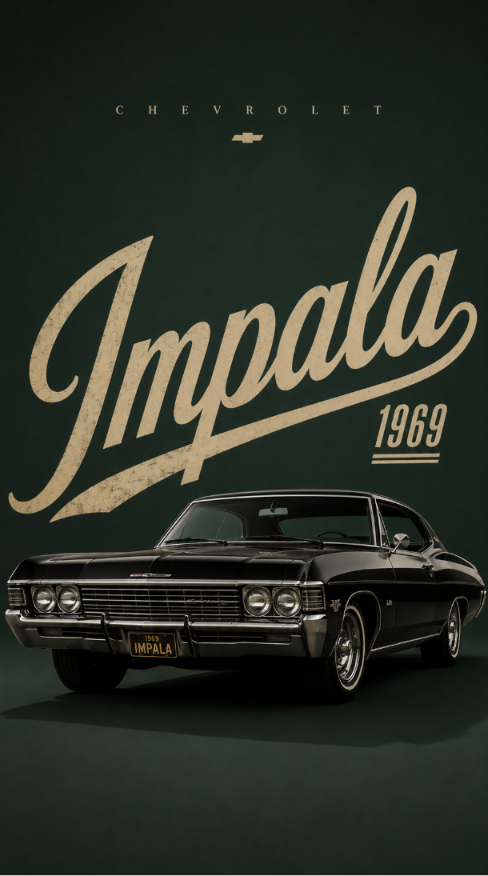
Automotive Poster Ver-2.0
Create a premium minimalist automotive poster for [CAR NAME / MODEL], inspired by luxury editorial car advertisements.

Use a clean vertical 9:16 Instagram Reels/Story composition with a bold solid color background in [BACKGROUND COLOR]. The background color should match the car’s personality, brand identity, era, and mood.

Place the car as the main subject in the lower-middle area. The car should look realistic, premium, sharp, glossy, and detailed, with accurate proportions, clean reflections, crisp edges, studio-quality lighting, and a natural shadow under the vehicle.

Behind the car, add huge oversized typography showing the car model name: “[BIG WORD]”.

Typography Direction:
Choose a typography style that matches the personality, era, and design language of the car. Do not use the same tall bold font every time.

Randomly select or intelligently choose one typography style:
- Tall condensed bold font for luxury sedans, SUVs, and classic premium cars
- Wide futuristic font for hypercars, EVs, and concept cars
- Aggressive sharp angular font for sports cars and performance cars
- Retro serif or vintage poster font for classic cars
- Elegant thin luxury serif font for premium luxury cars
- Creative cursive/script font for stylish lifestyle cars or heritage editions
- Glitch/distorted digital font for cyberpunk, electric, futuristic, or modified cars
- Rugged industrial stencil font for off-road SUVs and adventure vehicles
- Racing decal-style typography for track cars, rally cars, and supercars
- Minimal clean geometric sans-serif for modern EVs and clean luxury cars

The large background typography should feel unique to the car, not generic. It may be oversized, stretched, stacked, angled, partially cropped, transparent, outlined, embossed, shadowed, layered, or blended into the background depending on the car theme.

Add small spaced-out brand text at the top: “[BRAND NAME]”. Keep enough empty space at the top and sides for a clean premium layout.

Style: luxury automotive poster, minimalist editorial layout, high-end car magazine aesthetic, realistic car render, clean shadow, bold color contrast, premium typography, no extra objects, no people, no clutter.
Automotive Poster Ver-3.0
Generate image
Cinematic automotive billboard poster featuring [CAR MODEL NAME] as the hero vehicle.

Analyze the vehicle's design language, brand heritage, segment, performance character, luxury positioning, and visual identity. Automatically determine the most suitable paint color, finish, environment, camera angle, lighting, typography, materials, and color grading.

Position the vehicle center-frame with a dominant presence and premium advertising composition. Automatically select the camera angle that best showcases the vehicle's proportions and character.

Apply world-class automotive lighting with:

• soft cinematic key lights
• controlled rim lighting
• premium reflection shaping
• deep contrast
• realistic paint microtexture

Avoid excessive light streaks, lens flares, neon effects, or distracting visuals.

Create an environment that naturally reflects the vehicle's identity:

• Supercars → dramatic performance architecture
• Sports Cars → premium automotive-inspired industrial settings
• Luxury Sedans → elegant modern architecture
• SUVs → rugged landscapes and adventure scenery
• EVs → futuristic minimal environments
• Off-Road Vehicles → wild natural terrain

Massive billboard-style typography featuring the manufacturer's name in ultra-condensed white lettering integrated into the background architecture. Typography should span edge-to-edge behind the vehicle with subtle divider lines, premium execution, and no distortion.

Use premium architectural wall panels, geometric divisions, brushed metal, concrete, or showroom-inspired surfaces instead of aggressive light bars.

Add a sleek editorial specification strip along the bottom containing 5–8 premium vehicle details. Minimal typography, thin divider lines, luxury watch-catalog aesthetics.

Ground surface should be selected automatically and feature subtle controlled reflections.

Atmospheric effects such as haze, mist, smoke, or volumetric depth should be used only when they enhance the scene.

Place the manufacturer's logo subtly in the top-right corner with small uppercase text:

STRICT RULES

— no taglines
— no marketing copy
— no pricing
— no people
— no random props
— no license plate text
— no oversized specifications
— no excessive light streaks or neon effects

Render as hyper-realistic automotive photography with ultra-sharp details, physically accurate reflections, cinematic color grading, premium advertising quality, and award-winning automotive campaign aesthetics.

Composition must feel balanced, symmetrical, timeless, and worthy of a global automotive billboard campaign.

Format: 4:5 (1080X1350), ultra-high resolution, print-ready finish.
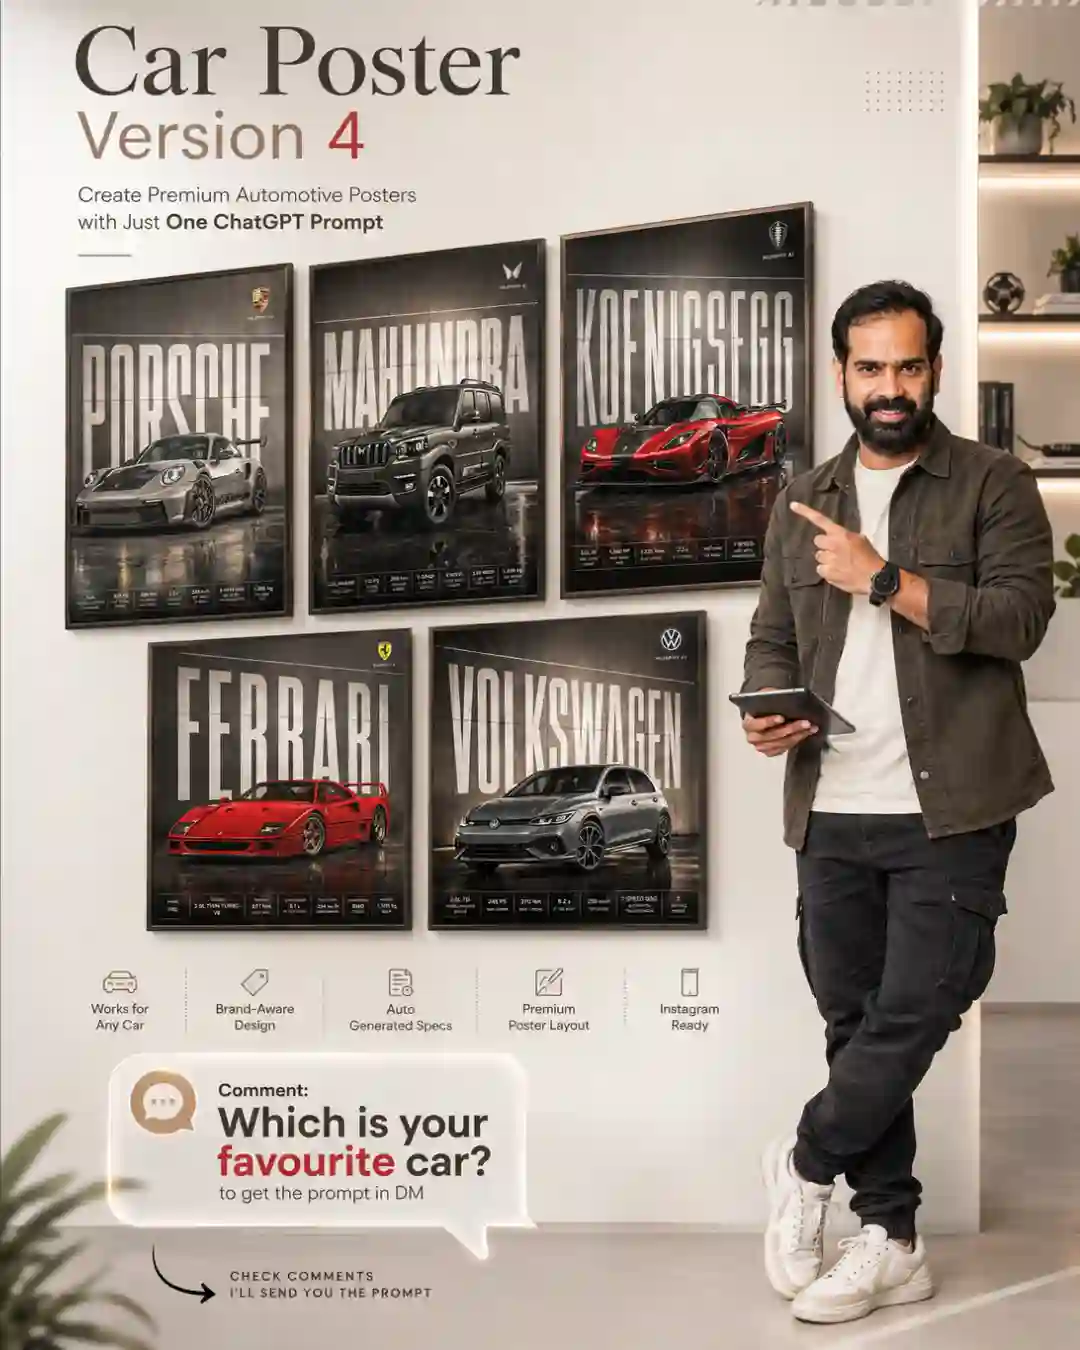
Automotive Poster Ver-4.0
Create a premium bright 4:5 collectible automotive poster for the [CAR NAME].

The design should look like a luxury museum-grade automotive print, combining realistic high-end car photography, editorial magazine layout, collectible motorsport details, and refined minimalist poster design.

The car must be the main hero subject, large in the frame, placed slightly off-center with a dynamic diagonal angle.
Keep the composition spacious, clean, premium, and bright.
Use intentional negative space in the upper area for large typography.

Add massive elegant masthead typography reading “[CAR MODEL]” across the upper background.
The typography should be integrated behind or around the car using subtle transparency, masking, overlap, and depth layering.
It should feel like a luxury automotive magazine cover, not a simple text overlay.

Environment should automatically match the personality of the car:
hypercar in a premium racetrack or futuristic city,
supercar on a sunlit coastal road or luxury mountain pass,
JDM car in a refined neon urban street,
luxury sedan near modern architecture,
vintage classic on a golden cinematic highway,
off-road SUV in bright dusty terrain,
Mini Cooper on retro European café streets,
muscle car on a refined American desert highway,
compact sedan near modern residential architecture or clean city roads.

Add subtle collectible elements:
technical specs, blueprint sketches, chassis number, serial ID, production year, signature mark, collector’s edition number, telemetry micro labels, premium border lines, heritage badges, and small editorial labels.

Lighting must be bright and premium:
soft daylight, golden-hour highlights, realistic glossy reflections, clean shadows, refined contrast, atmospheric depth, matte paper texture, subtle grain, and embossed print feel.

Use an elegant restrained color palette based on the car identity:
cream, beige, muted gold, soft black, graphite, silver, deep red, navy, or heritage green.
Avoid dark-heavy tones and oversaturation.

Final image should feel like a luxury gallery poster, collectible, polished, bright, editorial, and timeless.

Negative:
dark mood, black background, generic wallpaper, dealership ad, centered car, floating car, pasted look, oversaturated colors, excessive effects, cluttered layout, cheap racing graphics, fake HDR, low detail, cartoon look, distorted car, messy text, unreadable typography, wrong logo, harsh shadows, chaotic background.
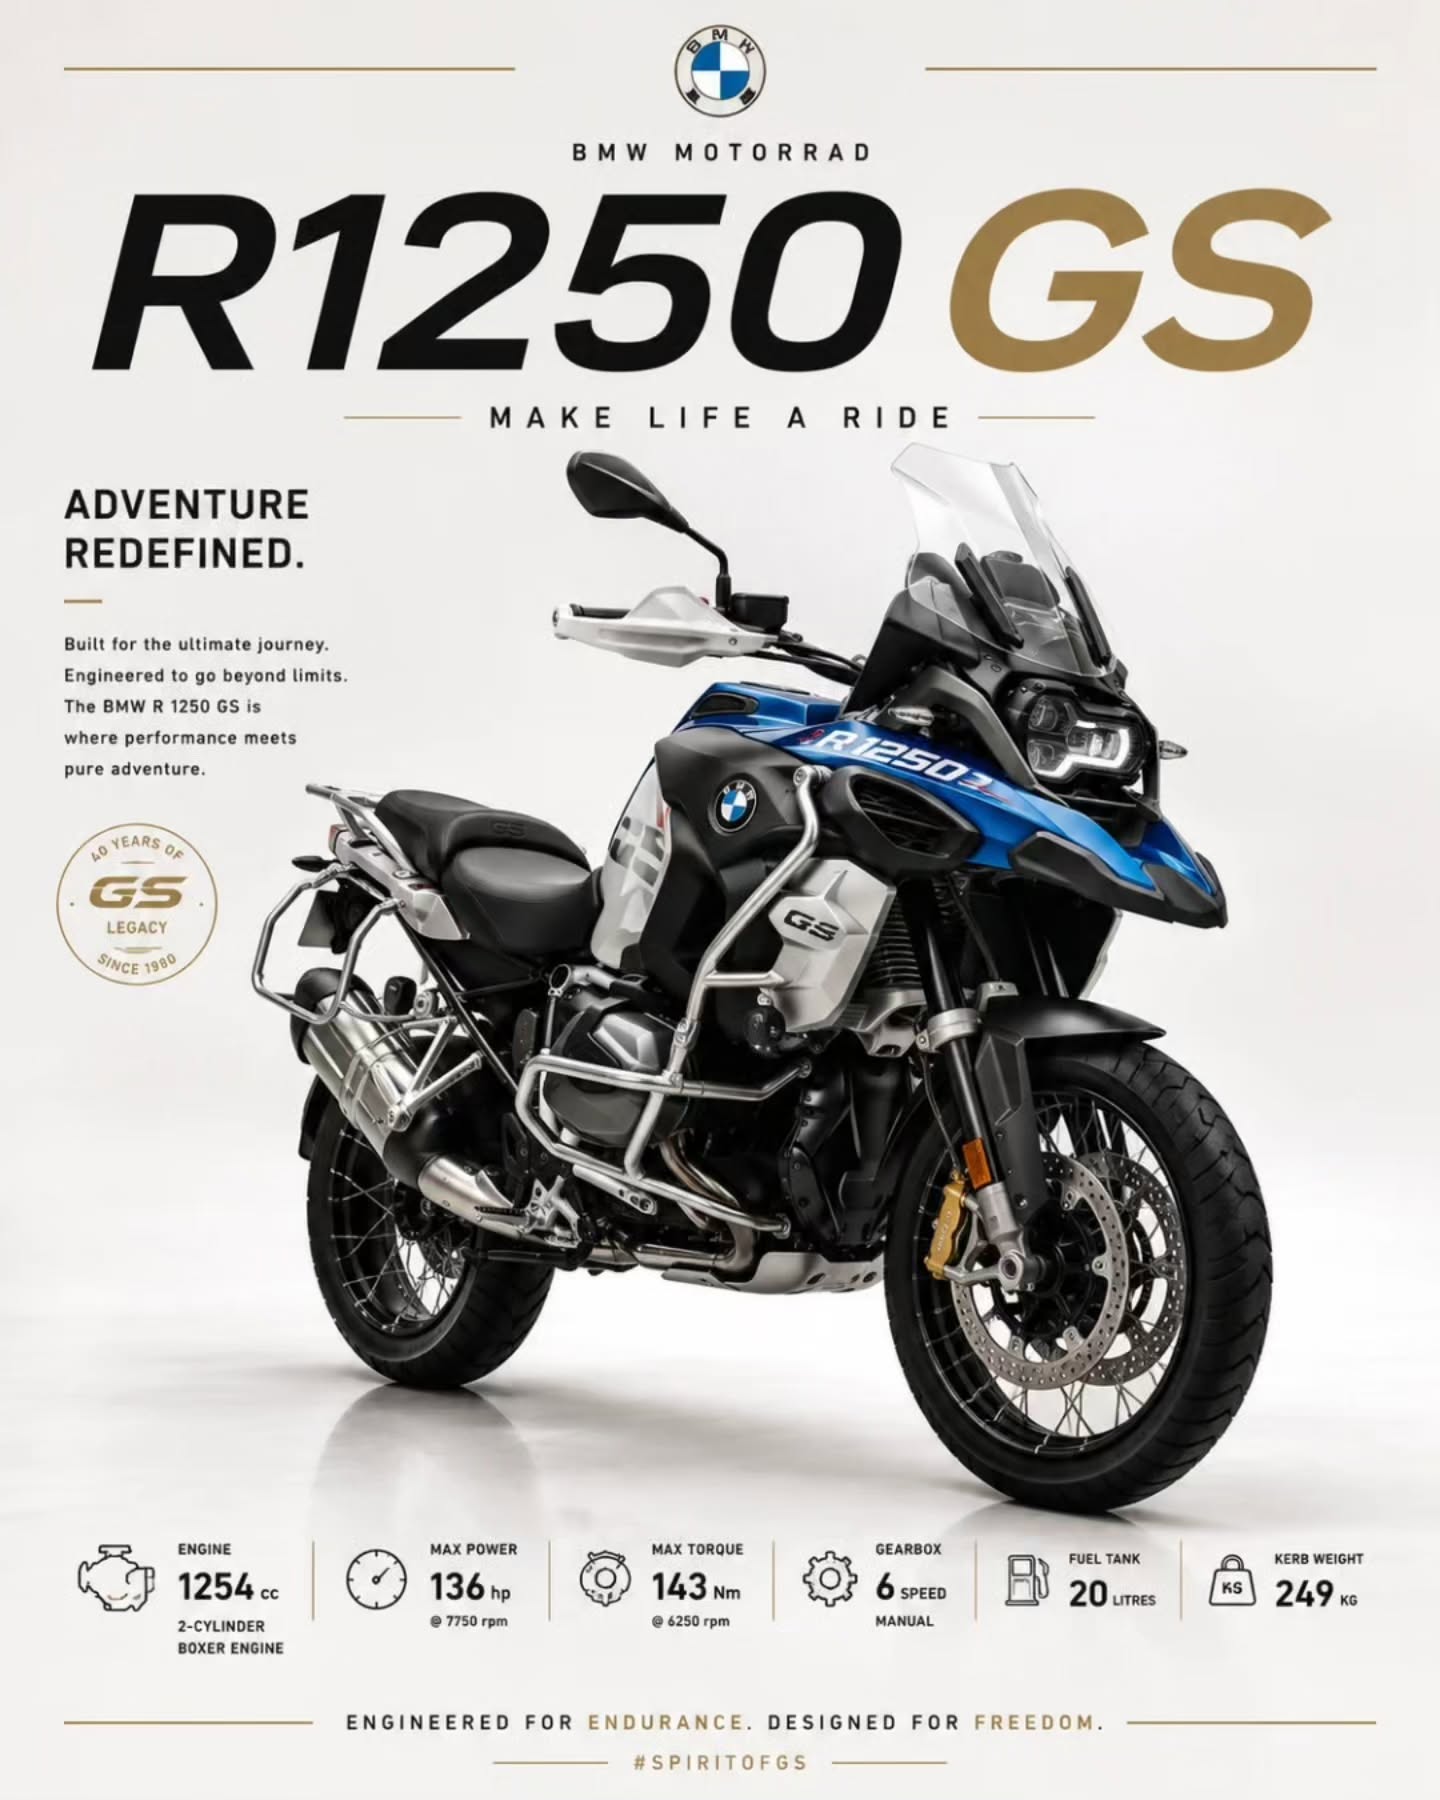
Bike Edition
Automotive Poster Ver-5.0
Create a premium bright 4:5 luxury museum-grade bike poster for the [Bike Name]. The bike should be the main hero subject, large in the frame, placed slightly off-center with a clean diagonal angle. Use realistic high-end automotive photography, bright studio lighting, soft shadows, glossy reflections, and a spacious premium white or light beige background.Add refined editorial poster layout elements: elegant title typography, small technical specification text, thin divider lines, subtle collectible badge, and minimal luxury branding details.Keep the composition clean, bright, expensive, modern, and print-worthy.Ultra-realistic, high-detail, premium automotive poster, luxury showroom aesthetic, 4:5 aspect ratio.
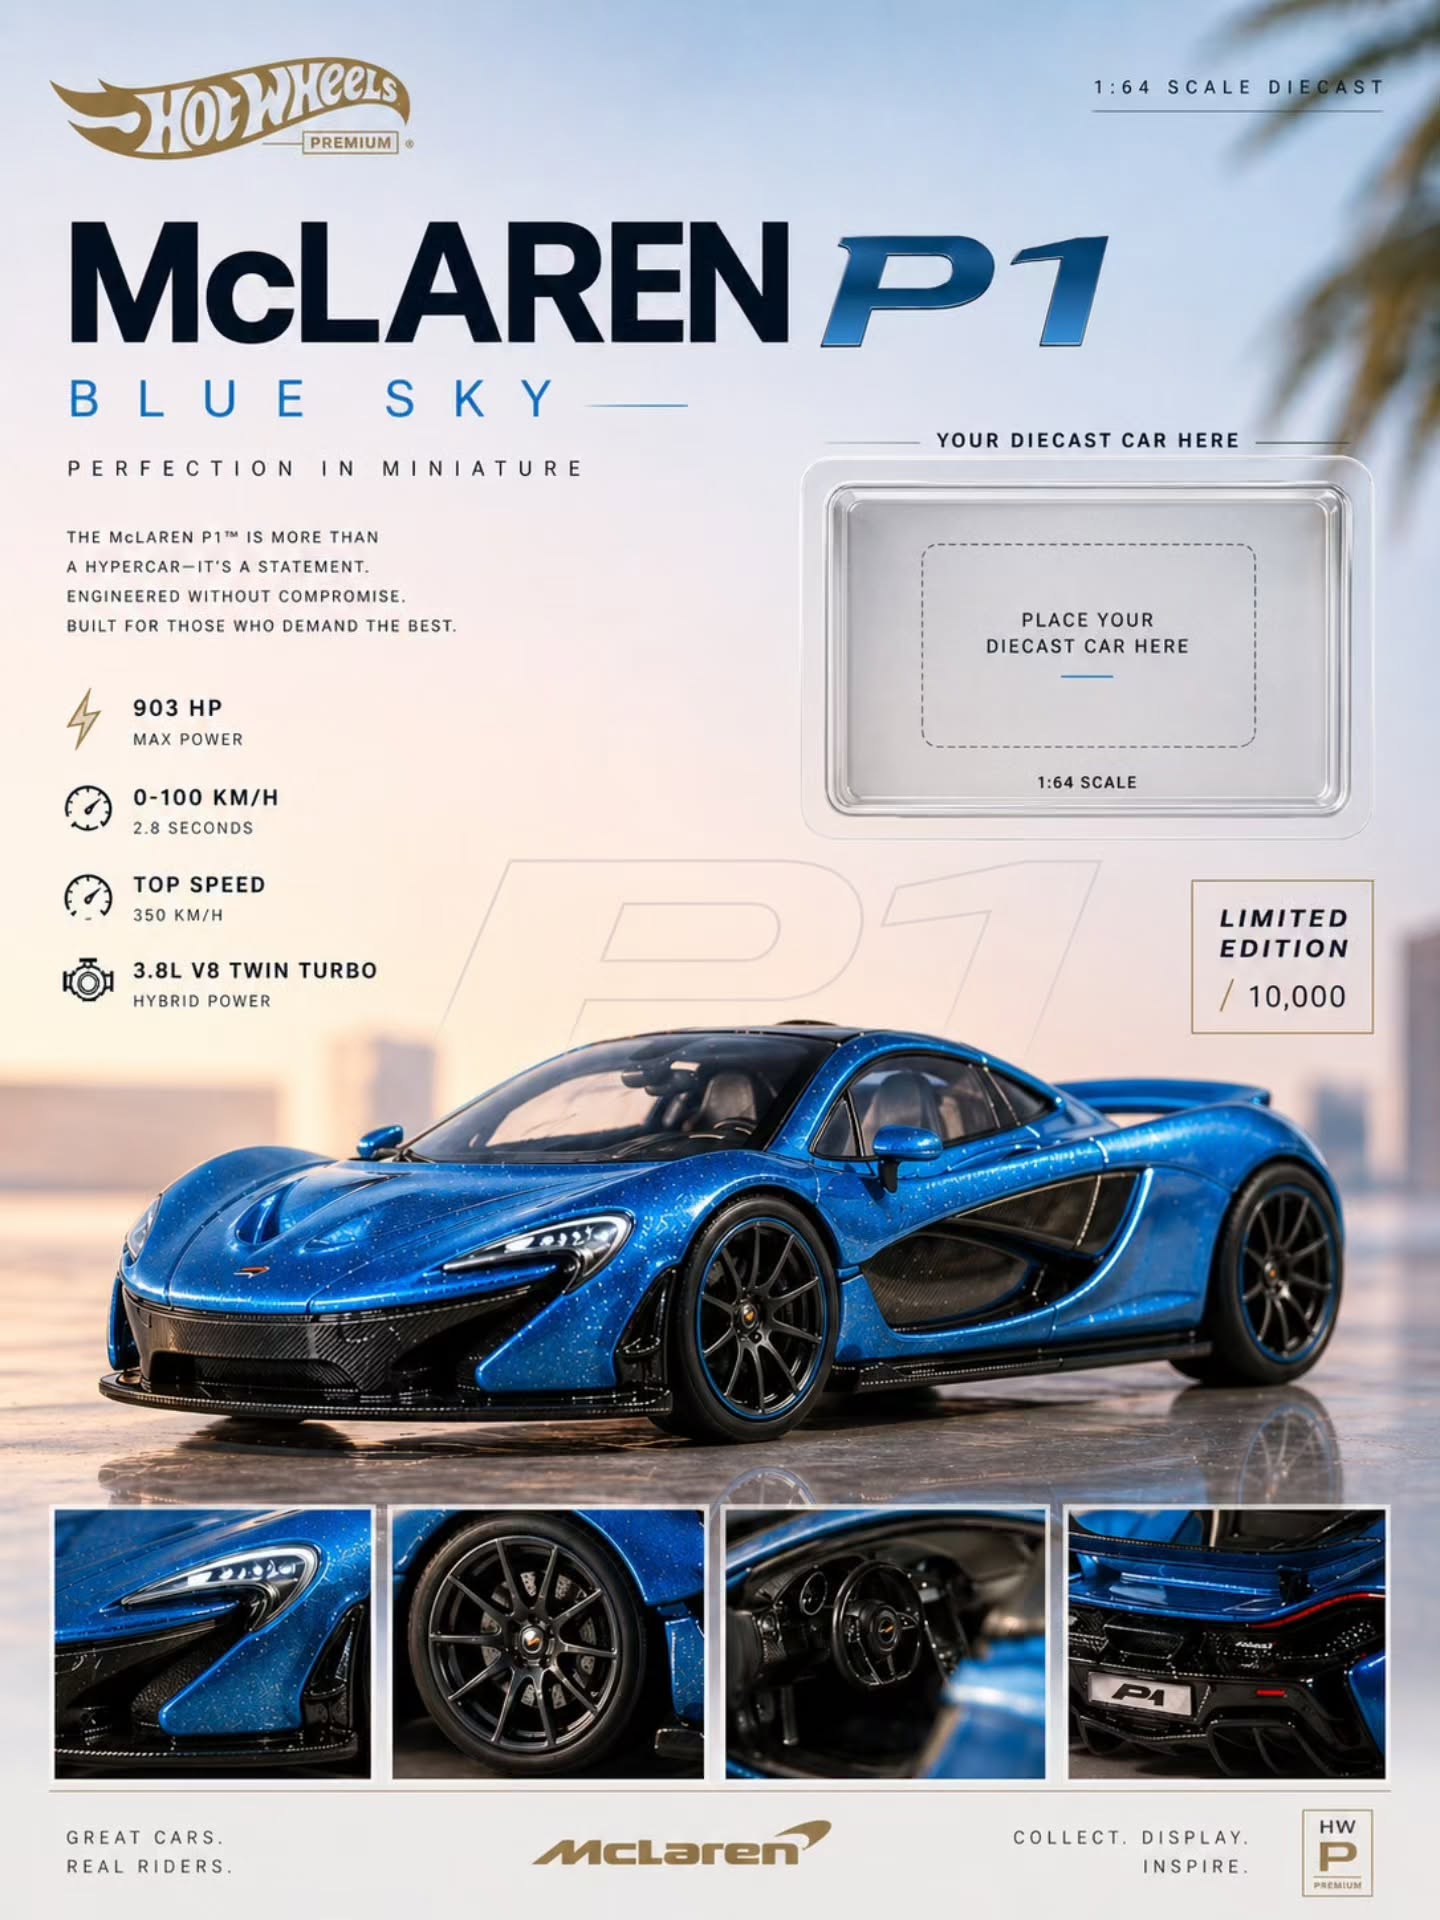
Hot Wheel Edition
Automotive Poster Ver-6.0
Create a premium aesthetic diecast poster for [CAR MODEL or uploaded image] (1:64). Show the car as the main hero at the bottom in a three-quarter angle, macro style with sharp focus — highlight metallic paint, reflections, panel lines, rubber tires, and fine details. Use a minimal soft gradient background based on the car’s color, with clean lighting and subtle shadows. Add clean typography: Brand + model name (bold) Small “1:64 scale” Minimal specs (optional) Include a small placeholder slot for a real diecast car: Position: top-right or mid-right Style: thin rounded frame / subtle blister tray look Add light shadow for depth Small text: “Place diecast here” Keep layout spacious, balanced, and grid-based. Style: luxury automotive poster, minimal, clean, high-end, frame-worthy.
Most of these prompts are shared on Instagram before they land on this page. Follow 🅾 𝐈𝐧𝐬𝐭𝐚𝐠𝐫𝐚𝐦 @thesaurabhsource for early access.
More Posters Coming Soon
I’m constantly testing new poster styles and adding the best ones here.
Upcoming ideas:
JDM Posters
Racing Posters
Off-Road Posters
Hypercar Posters
Automotive Editorial Posters
Vintage Car Posters
Dealership Advertisement Posters
Motorsport Posters
So if you enjoy creating automotive artwork, bookmark this page and check back from time to time.
Why I Created This Collection
I was tired of seeing generic prompts that produced average-looking results.
Most of the prompts you find online are either too short, too vague, or simply don’t create the premium automotive look many creators are after.
So I started building my own poster systems.
After testing hundreds of generations, refining layouts, adjusting lighting styles, and experimenting with different visual directions, I began saving the best versions.
This page is where I’ll keep sharing them.
Whether you’re creating content for Instagram, building a portfolio, printing wall art, or just having fun with AI, these prompts should give you a strong starting point.
Like These Posters?
These are just the final versions.
On Instagram, I share:
✅ New poster concepts before they’re published here
✅ AI workflows & tricks
✅ Prompt breakdowns
✅ Design resources
✅ Behind-the-scenes experiments
👉 Follow @thesaurabhsource and join thousands of creators exploring AI design and content creation.
Frequently Asked Questions
Which AI tools do these prompts work with?
Most of these prompts can be adapted for ChatGPT Images, Midjourney, Flux, Ideogram, and other modern AI image generators.
Are the prompts free to use?
Yes. Feel free to use them and experiment with your own variations.
Will new poster versions be added?
Absolutely. This page will keep growing as I create new poster styles.
Can I modify the prompts?
Of course. Think of these as a foundation. Change the car, environment, colors, lighting, or typography to match your vision.
Which poster style should I start with?
If you’re new, start with Car Poster V1. It’s the most versatile and works with almost any vehicle.
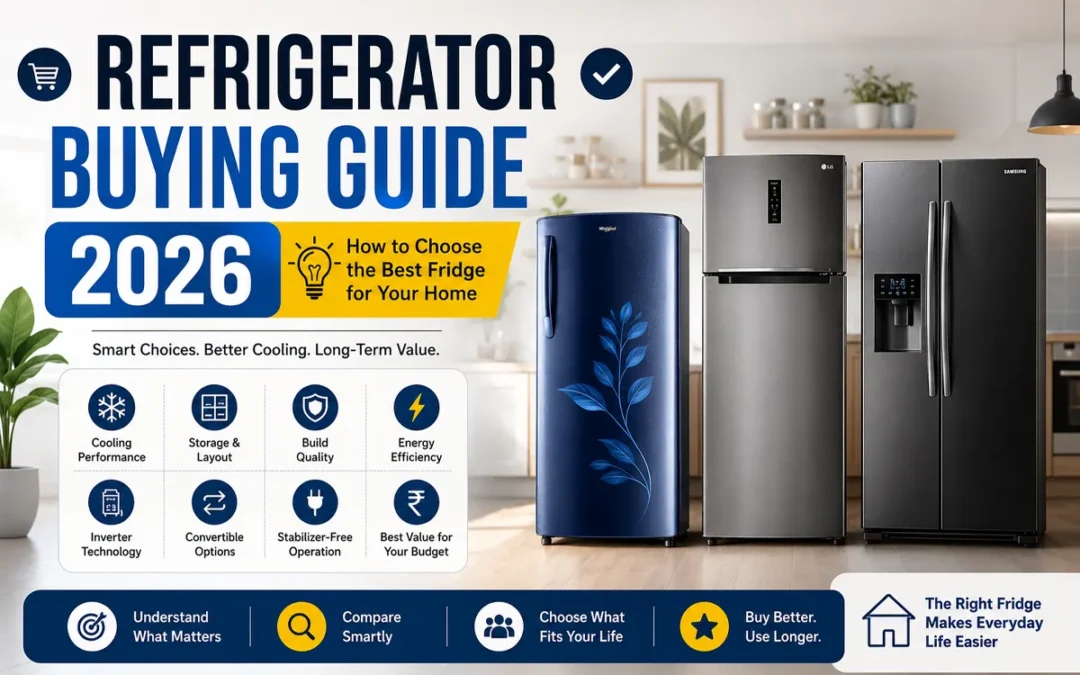
Welcome to your refrigerator buying guide 2026 — written for the person who opened 12 tabs and still has no idea what to buy.
Single door, double door, frost-free, inverter compressor, convertible, star rating, capacity — suddenly everything feels messy.
Here’s the truth: most people don’t buy the wrong refrigerator because they’re careless. They buy the wrong one because nobody explained the basics properly.
Refrigerator Buying Guide 2026: Which Type Should You Actually Buy?
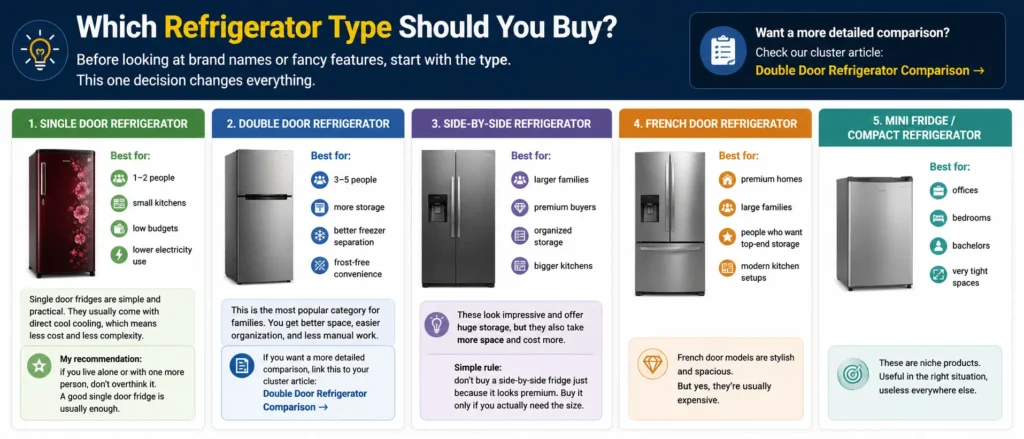
Before looking at brand names or fancy features, start with the type. This one decision changes everything.
Single Door Refrigerator
Best for:
1–2 people
small kitchens
low budgets
lower electricity use
Single door fridges are simple and practical. They usually come with direct cool cooling, which means less cost and less complexity.
My recommendation: if you live alone or with one more person, don’t overthink it. A good single door fridge is usually enough.
Double Door Refrigerator
Best for:
3–5 people
more storage
better freezer separation
frost-free convenience
This is the most popular category for families. You get better space, easier organization, and less manual work.
Side-by-Side Refrigerator
Best for:
larger families
premium buyers
organized storage
bigger kitchens
These look impressive and offer huge storage, but they also take more space and cost more.
Simple rule: don’t buy a side-by-side fridge just because it looks premium. Buy it only if you actually need the size.
French Door Refrigerator
Best for:
premium homes
large families
people who want top-end storage
modern kitchen setups
French door models are stylish and spacious. But yes, they’re usually expensive.
Mini Fridge / Compact Refrigerator
Best for:
offices
bedrooms
bachelors
very tight spaces
These are niche products. Useful in the right situation, useless everywhere else.
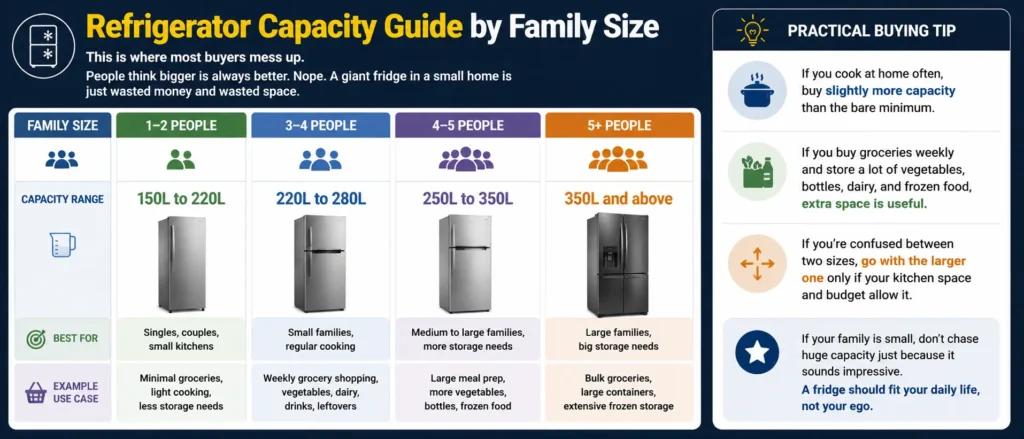
Refrigerator Capacity Guide by Family Size
This is where most buyers mess up.
People think bigger is always better. Nope. A giant fridge in a small home is just wasted money and wasted space.
Simple capacity rule
1–2 people: 150L to 220L
3–4 people: 220L to 280L
4–5 people: 250L to 350L
5+ people: 350L and above
If your family is small, don’t chase huge capacity just because it sounds impressive.
A fridge should fit your daily life, not your ego.
Practical buying tip
If you cook at home often, buy slightly more capacity than the bare minimum.
If you buy groceries weekly and store a lot of vegetables, bottles, dairy, and frozen food, extra space is useful.
If you’re confused between two sizes, go with the larger one only if your kitchen space and budget allow it.
Capacity planning is a step most refrigerator buying guides 2026 recommend getting right before anything else.
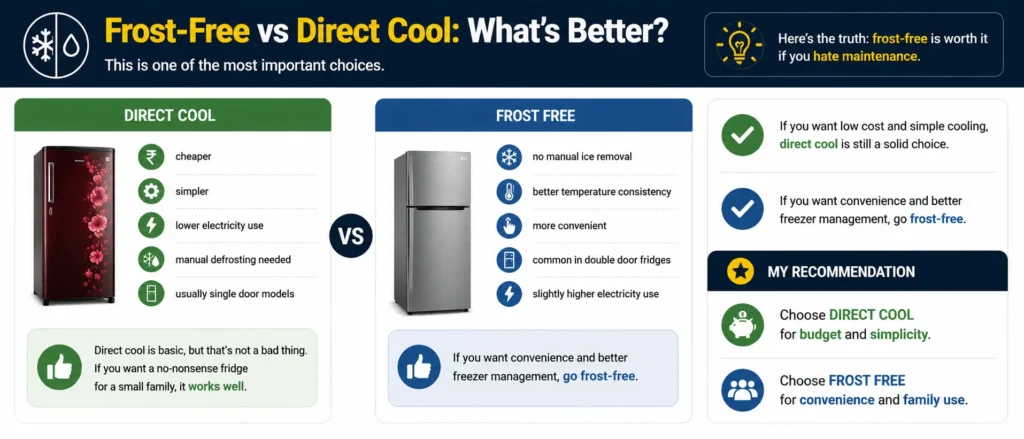
Frost-Free vs Direct Cool: What’s Better?
This is one of the most important choices.
Direct Cool
cheaper
simpler
lower electricity use
manual defrosting needed
usually single door models
Direct cool is basic, but that’s not a bad thing. If you want a no-nonsense fridge for a small family, it works well.
Frost Free
no manual ice removal
better temperature consistency
more convenient
common in double door fridges
slightly higher electricity use
Here’s the truth: frost-free is worth it if you hate maintenance.
If you want convenience and better freezer management, go frost-free.
If you want low cost and simple cooling, direct cool is still a solid choice.
My recommendation:
choose direct cool for budget and simplicity
choose frost free for convenience and family use
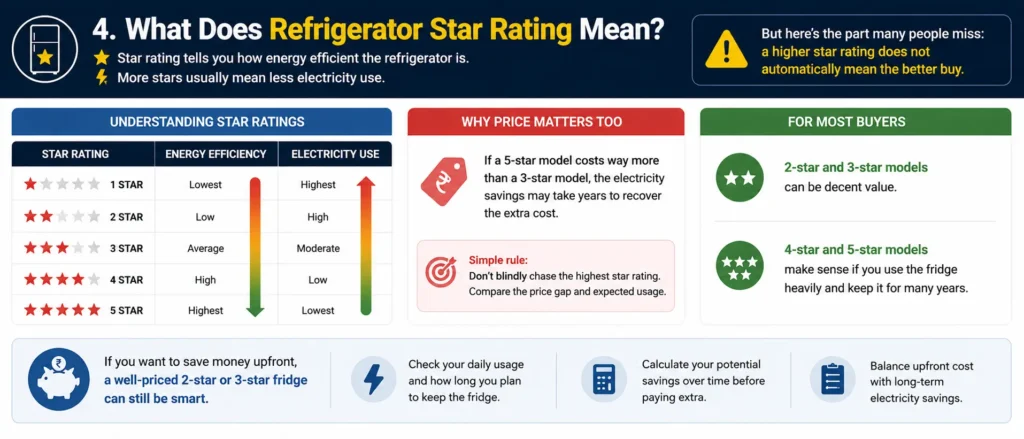
What Does Refrigerator Star Rating Mean?
Star rating tells you how energy efficient the refrigerator is.
More stars usually mean less electricity use.
But here’s the part many people miss: a higher star rating does not automatically mean the better buy.
Why? Because price matters too.
If a 5-star model costs way more than a 3-star model, the electricity savings may take years to recover the extra cost.
Simple rule:
Don’t blindly chase the highest star rating. Compare the price gap and expected usage.
For most buyers:
2-star and 3-star models can be decent value
4-star and 5-star models make sense if you use the fridge heavily and keep it for many years
If you want to save money upfront, a well-priced 2-star or 3-star fridge can still be smart.
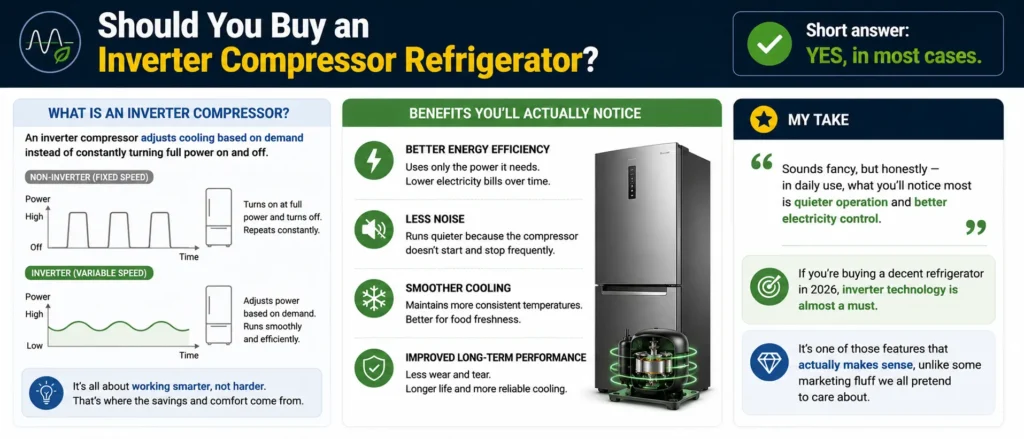
Should You Buy an Inverter Compressor Refrigerator?
Short answer: yes, in most cases.
An inverter compressor adjusts cooling based on demand instead of constantly turning full power on and off.
That means:
better energy efficiency
less noise
smoother cooling
improved long-term performance
Sounds fancy, but honestly — in daily use, what you’ll notice most is quieter operation and better electricity control.
My take: If you’re buying a decent refrigerator in 2026, inverter technology is almost a must.
It’s one of those features that actually makes sense, unlike some marketing fluff we all pretend to care about.
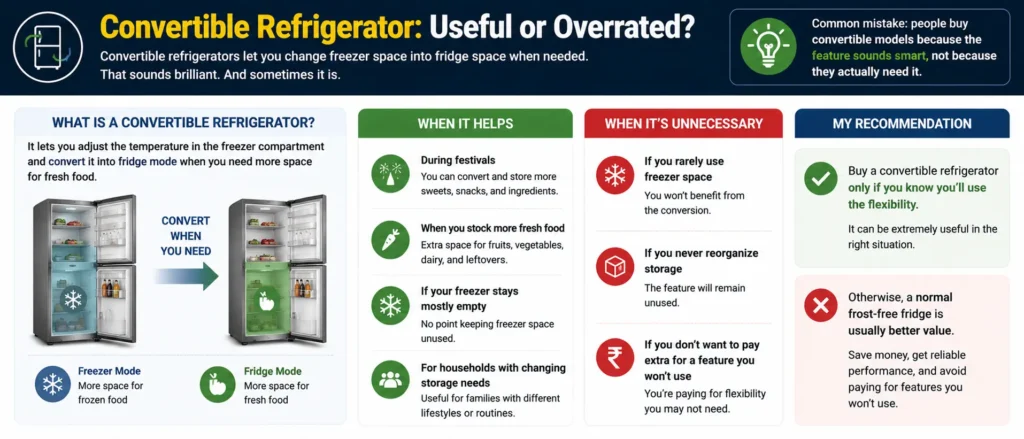
Convertible Refrigerator: Useful or Overrated?
Convertible refrigerators let you change freezer space into fridge space when needed.
That sounds brilliant. And sometimes it is.
When it helps
during festivals
when you stock more fresh food
if your freezer stays mostly empty
for households with changing storage needs
When it’s unnecessary
if you rarely use freezer space
if you never reorganize storage
if you don’t want to pay extra for a feature you won’t use
Common mistake: people buy convertible models because the feature sounds smart, not because they actually need it.
This is one of the most overlooked tips in any refrigerator buying guide 2026.
My recommendation: Buy a convertible refrigerator only if you know you’ll use the flexibility.
Otherwise, a normal frost-free fridge is usually better value.
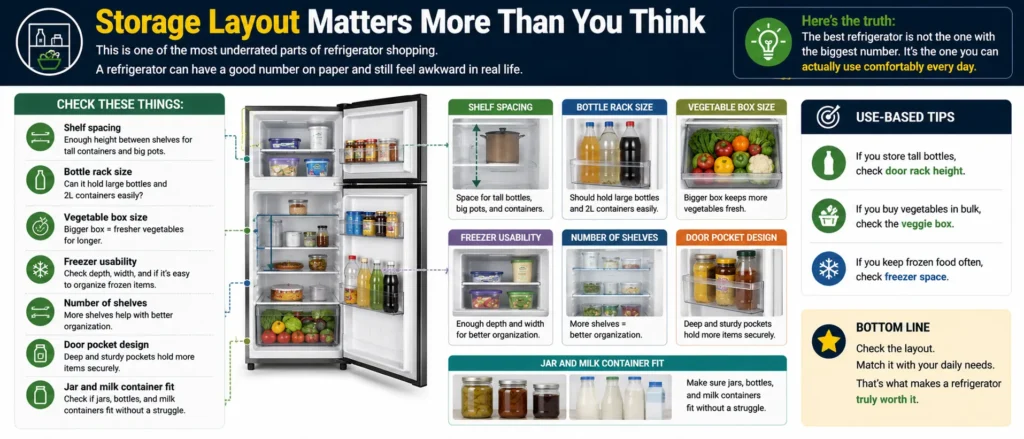
Storage Layout Matters More Than You Think
This is one of the most underrated parts of refrigerator shopping.
People look at capacity in liters and assume that’s enough. Not really.
A refrigerator can have a good number on paper and still feel awkward in real life.
Check these things:
shelf spacing
bottle rack size
vegetable box size
freezer usability
number of shelves
door pocket design
jar and milk container fit
Here’s the truth: the best refrigerator is not the one with the biggest number. It’s the one you can actually use comfortably every day.
If you store tall bottles, check door rack height. If you buy vegetables in bulk, check the veggie box. If you keep frozen food often, check freezer space.
That’s the stuff that matters.
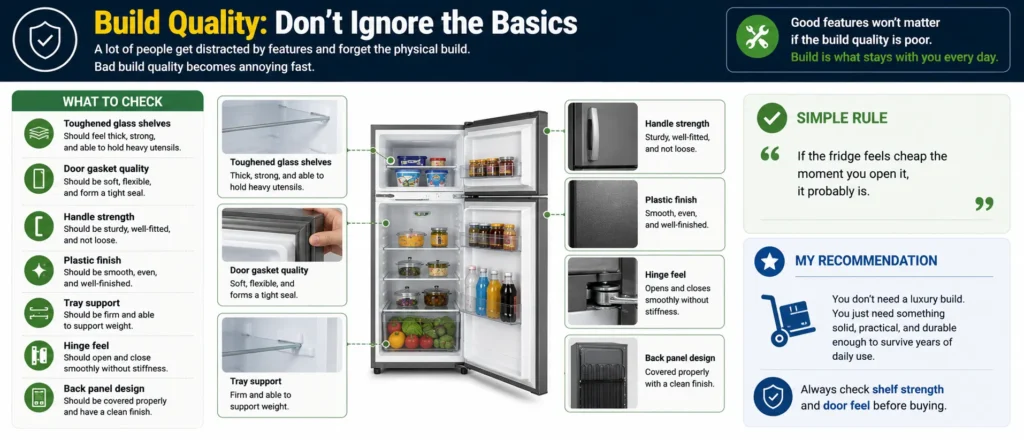
Build Quality: Don’t Ignore the Basics
A lot of people get distracted by features and forget the physical build.
Bad build quality becomes annoying fast.
What to check
toughened glass shelves
door gasket quality
handle strength
plastic finish
tray support
hinge feel
back panel design
Simple rule: if the fridge feels cheap the moment you open it, it probably is.
You don’t need a luxury build. You just need something solid, practical, and durable enough to survive years of daily use.
Build quality is one factor most refrigerator buying guide 2026 checklists forget to mention — but it matters more than most specs.
My recommendation: Always check shelf strength and door feel before buying.
Stabilizer-Free Operation: Should You Care?
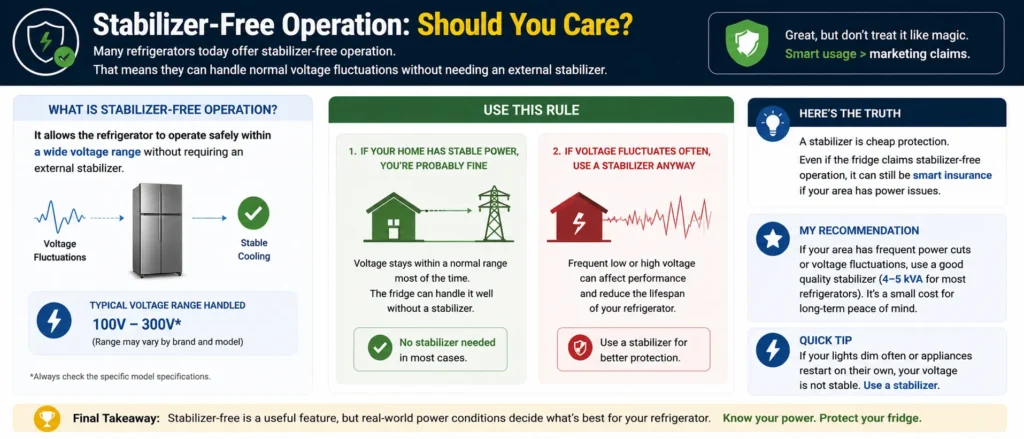
Many refrigerators today offer stabilizer-free operation.
That means they can handle normal voltage fluctuations without needing an external stabilizer.
Great, but don’t treat it like magic.
Use this rule:
if your home has stable power, you’re probably fine
if voltage fluctuates often, use a stabilizer anyway
Here’s the truth: a stabilizer is cheap protection.
Even if the fridge claims stabilizer-free operation, it can still be smart insurance if your area has power issues.
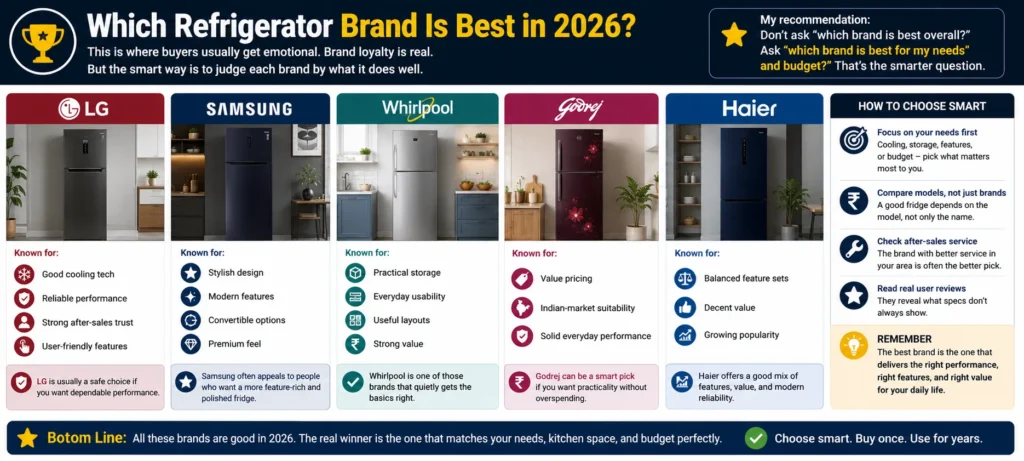
Which Refrigerator Brand Is Best in 2026?
This is where buyers usually get emotional. Brand loyalty is real.
But the smart way is to judge each brand by what it does well.
My recommendation: Don’t ask “which brand is best overall?” Ask “which brand is best for my needs and budget?”
That’s the smarter question.
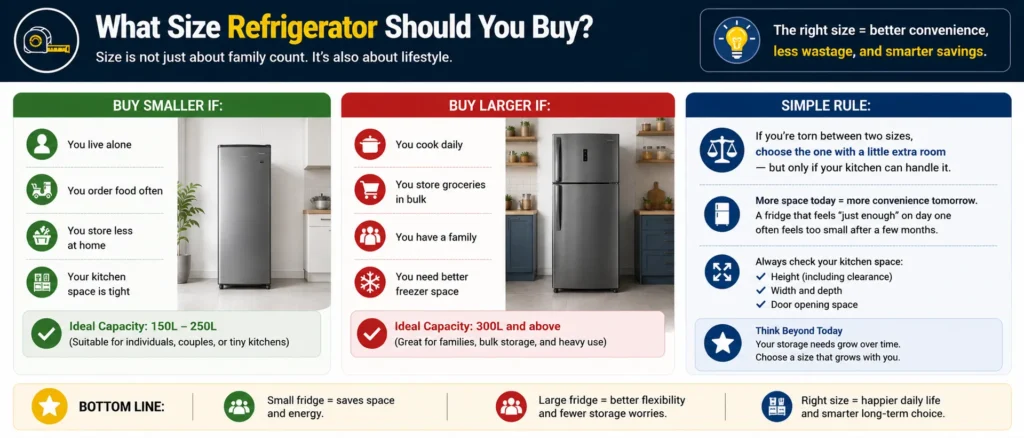
What Size Refrigerator Should You Buy?
Size is not just about family count. It’s also about lifestyle.
Buy smaller if:
you live alone
you order food often
you store less at home
your kitchen space is tight
Buy larger if:
you cook daily
you store groceries in bulk
you have a family
you need better freezer space
Simple rule: If you’re torn between two sizes, choose the one with a little extra room — but only if your kitchen can handle it.
A fridge that feels “just enough” on day one often feels too small after a few months.
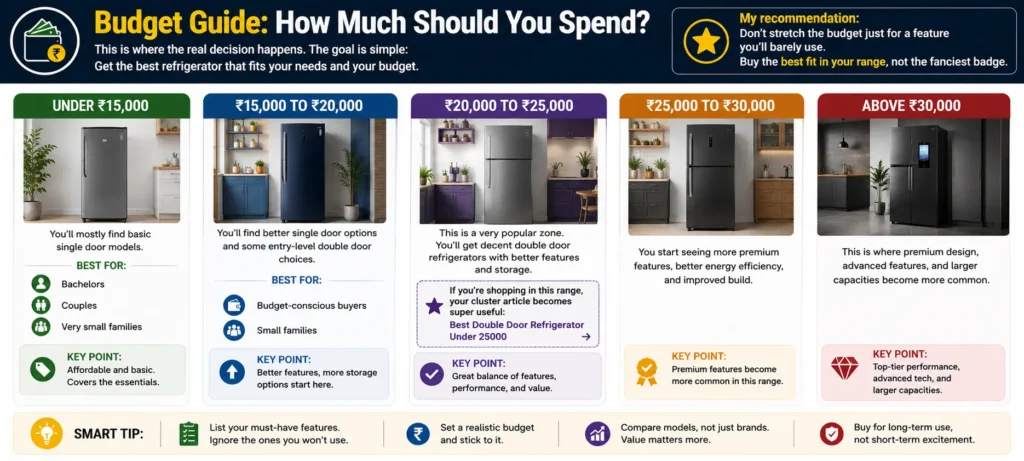
Budget Guide: How Much Should You Spend?
This is where the real decision happens.
Under 15,000
You’ll mostly find basic single door models. Best for:
bachelors
couples
very small families
15,000 to 20,000
You’ll find better single door options and some entry-level double door choices. Best for:
budget-conscious buyers
small families
20,000 to 25,000
This is a very popular zone. You’ll get decent double door refrigerators with better features and storage. If you’re shopping in this range, your cluster article becomes super useful:
Best Double Door Refrigerator Under 25000
25,000 to 30,000
You start seeing more premium features, better energy efficiency, and improved build.
Above 30,000
This is where premium design, advanced features, and larger capacities become more common.
My recommendation: Don’t stretch the budget just for a feature you’ll barely use. Buy the best fit in your range, not the fanciest badge.
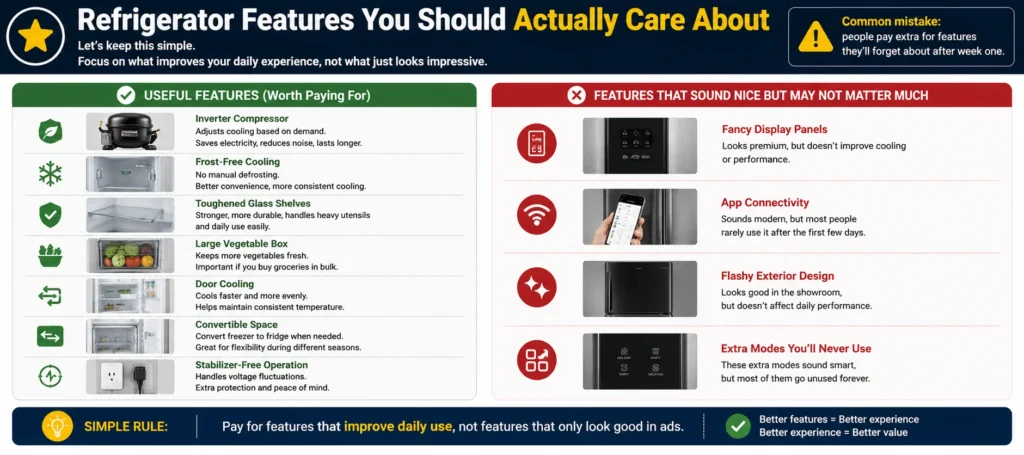
Refrigerator Features You Should Actually Care About
Let’s keep this simple.
Useful features
inverter compressor
frost-free cooling
toughened glass shelves
large vegetable box
door cooling
convertible space
stabilizer-free operation
Features that sound nice but may not matter much
fancy display panels
app connectivity
flashy exterior design
extra modes you’ll never use
Common mistake: people pay extra for features they’ll forget about after week one.
Simple rule: Pay for features that improve daily use, not features that only look good in ads.
Refrigerator Buying Checklist
Before you buy, check these points one by one.
Checklist
family size
available kitchen space
fridge type
capacity
star rating
inverter compressor
frost-free or direct cool
shelf quality
bottle storage
vegetable box size
freezer layout
brand service support
warranty
voltage handling
total price
If you can answer all of these clearly, you’re ready to buy.
If not, pause. A little research now saves a lot of regret later.
Final Recommendation
Here’s the short version.
If you want a refrigerator in 2026, don’t start with brand hype. Start with your actual need.
The simple decision formula:
small family = single door or compact double door
medium family = double door
large family = side-by-side or bigger capacity
low budget = direct cool or entry-level frost-free
convenience first = frost-free + inverter
extra flexibility = convertible only if you’ll use it
If I had to give one piece of advice, it would be this: Get the capacity and layout right first. Everything else is secondary.
Because a fridge that fits your life will always feel like a better buy than a “premium” one that doesn’t.
FAQ
Which refrigerator is best for a family of 3 to 4 people?
A double door refrigerator with around 220L to 280L capacity is usually a good fit.
Is frost-free better than direct cool?
Yes, if you want convenience. Direct cool is still fine if you want lower cost and simpler cooling.
Is a 3-star refrigerator good enough?
Yes, a 3-star refrigerator is a solid choice for many buyers. It balances energy savings and price well.
Should I buy a convertible refrigerator?
Only if you think you’ll actually use the flexible storage space.
Which brand is most reliable?
LG, Samsung, Whirlpool, Godrej, and Haier all have strong options. The best one depends on your budget and usage.
What does the star rating on a refrigerator mean?
The star rating shows how energy efficient the refrigerator is. A higher star rating usually means lower electricity use.
Is an inverter compressor worth it?
Yes, in most cases. An inverter compressor helps save electricity, reduces noise, and improves cooling performance.
Do I need a stabilizer for my refrigerator?
If your area has frequent voltage fluctuations, a stabilizer is a smart safety measure even if the refrigerator offers stabilizer-free operation.
What is the most important thing to check in a refrigerator buying guide 2026?
The most important thing to check is capacity — measured in litres — based on your family size. A family of 4 typically needs 300–400 litres. After that, look at energy star rating, cooling technology (inverter vs non-inverter), and warranty terms before making a final decision.
“Can I create these automatically using just ONE prompt?”
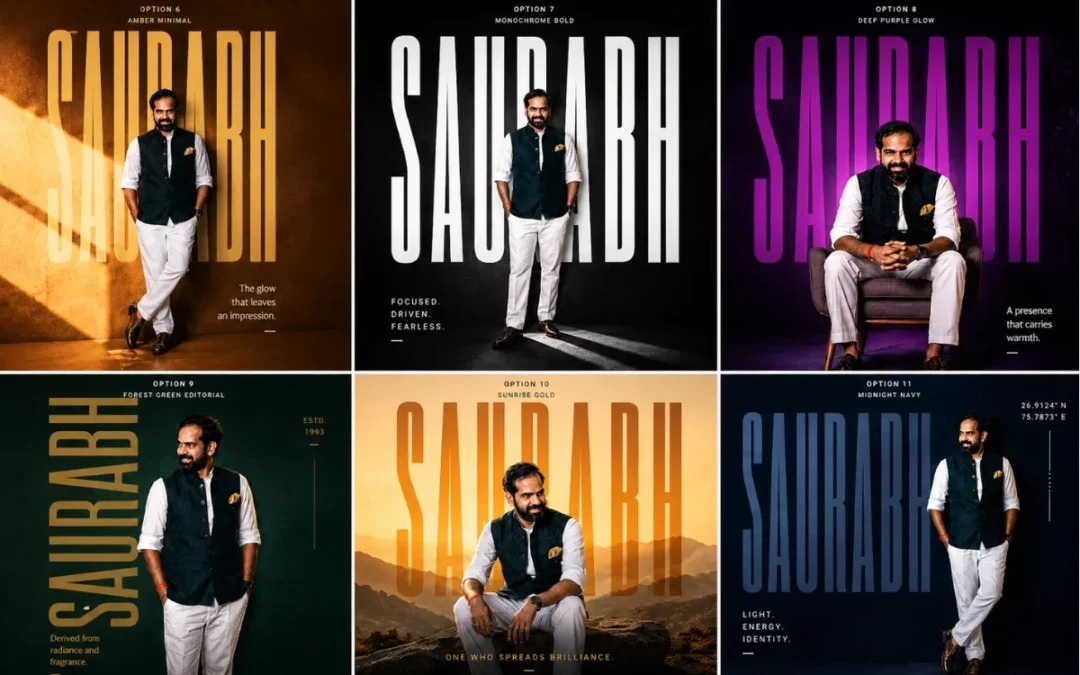
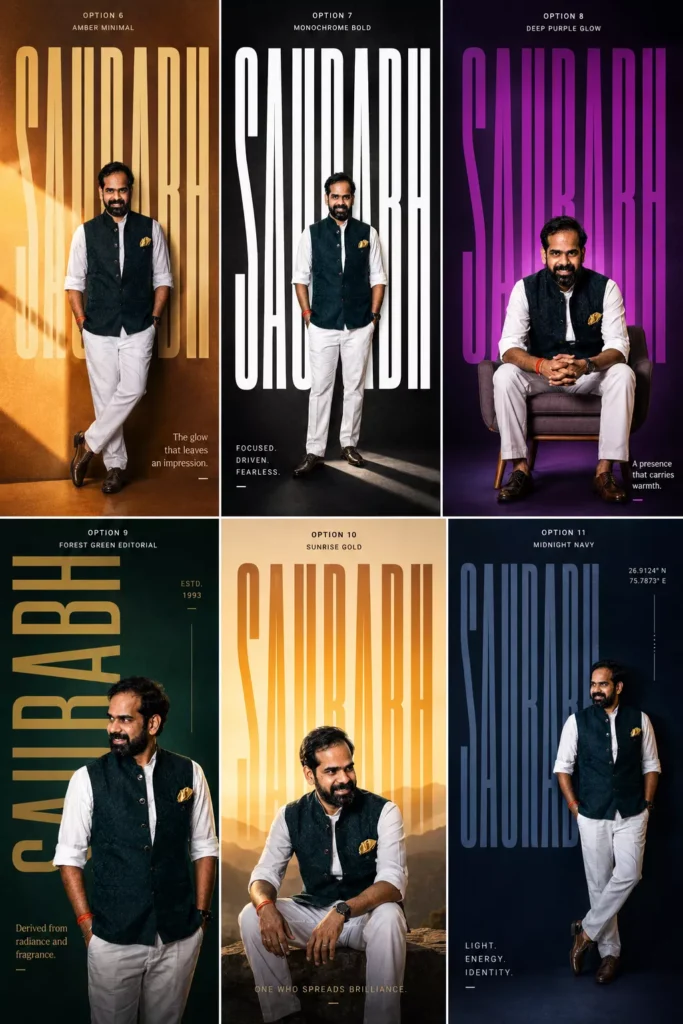
After testing a lot of prompts inside ChatGPT image generation, I finally created a ChatGPT AI poster prompt that generates random premium poster styles every single time.
You can use GPT image generation directly inside ChatGPT.
Step 2 — Upload Your Photo
Choose a good portrait photo.
Better photos = better posters.
I personally noticed these work best:
full-body shots
confident poses
side profiles
clean backgrounds
natural lighting
Avoid:
blurry selfies
group photos
low-light images
heavily filtered pictures
Step 3 — Paste This ChatGPT AI Poster Prompt
Here is the prompt
Create an ultra-premium 4:5 editorial typography poster using the uploaded portrait photo.

Keep the exact same face, identity, skin tone, hairstyle, and realism from the original image.

Name: “[NAME]”

Design Style:

* giant ultra-tall bold typography of the name
* typography integrated into composition
* modern luxury poster aesthetic
* cinematic lighting
* vibrant solid or gradient background
* premium grain texture
* Swiss/editorial layout
* asymmetrical composition
* realistic shadows and depth

Randomly vary:

* pose (standing, sitting, leaning, walking, side profile, candid)
* camera angle
* typography style
* color palette
* layout
* lighting mood
* graphic elements

Use styles inspired by:
fashion editorials, Spotify artist posters, A24 movie posters, luxury perfume ads, sports campaigns, brutalist typography, modern magazine covers.

Add:

* subtle geometric elements
* minimal symbols/coordinates
* sleek micro typography
* short poetic meaning line related to the name

Make it photorealistic, premium, cinematic, bold, modern, and visually striking.
Replace [NAME] with your own name.
Then hit generate.
That’s it.
Why This Prompt Works So Well
Most AI prompts fail because they’re too basic.
This one works because it gives:
strong visual direction
cinematic guidance
layout structure
typography hierarchy
random variation instructions
So every result feels unique.
One generation might look like:
a Netflix movie poster
The next one might look like:
a luxury fashion campaign
And another could look like:
a premium Spotify artist cover
That randomness is honestly the best part.
My Favorite AI Poster Styles
Cinematic Dark Posters
These look absolutely insane.
Moody shadows. Huge typography. Dark dramatic lighting.
Feels like a Christopher Nolan poster sometimes.
Minimal Swiss Typography Posters
Very clean. Very premium.
Mostly:
huge fonts
lots of negative space
subtle colors
modern layouts
These work REALLY well for Instagram profile aesthetics.
Sports Campaign Style Posters
These usually create:
energetic poses
bold lighting
aggressive typography
athlete-style compositions
Perfect for gym creators or sports pages.
Fashion Editorial Posters
Probably the most premium-looking style.
Feels like:
Vogue
GQ
luxury perfume campaigns
designer brand ads
Very cinematic.
Best Tips for Better AI Posters
Use Full-Body Photos
The AI creates much stronger compositions when it can see your posture and body angle.
Regenerate Multiple Times
This is VERY important.
Sometimes the first image is average.
Then suddenly the 4th generation looks absolutely crazy.
The AI randomization changes:
pose
layout
lighting
typography
composition
So keep experimenting.
Try Different Background Colors
Some color combinations look insanely premium.
My favorites:
orange + cream
deep blue + beige
crimson + gold
neon green + black
matte black + silver
Use Confident Photos
The AI performs better when your pose already has personality.
Even small things help:
side profile
looking away from camera
crossed arms
walking pose
candid posture
Can You Create Instagram Posters with This Prompt?
Absolutely.
Honestly this prompt feels MADE for Instagram.
You can use these posters for:
profile posts
reels covers
story uploads
Spotify-style edits
YouTube thumbnails
personal branding
gaming pages
fashion pages
The possibilities are endless.
I genuinely didn’t expect this prompt to work this well.
At first I was just experimenting for fun.
But after testing different typography styles, cinematic aesthetics, and editorial layouts… the results started looking insanely professional.
And now I honestly can’t stop generating these posters.
The craziest part?
You only need:
one photo
one prompt
one click
That’s it.
If you try this, definitely experiment with:
different poses
dramatic lighting
side profiles
sitting shots
fashion outfits
monochrome aesthetics
Because every generation gives a completely different vibe.
And honestly… that’s what makes this trend so addictive.
FAQs
What is the best ChatGPT AI poster prompt?
The best ChatGPT AI poster prompt includes cinematic lighting, typography direction, editorial composition, and random style variations for unique outputs.
Can ChatGPT create cinematic posters?
Yes. ChatGPT image generation can create premium cinematic posters using uploaded photos and detailed prompts.
Which photos work best for AI posters?
High-quality portrait or full-body photos with natural lighting usually generate the best AI posters.
Can I use these AI posters on Instagram?
Absolutely. These posters are perfect for Instagram posts, reels covers, profile branding, and aesthetic content.
Why do AI posters look different every time?
Because the prompt includes randomized layout, typography, pose, lighting, and composition instructions.